
How to Use This Section
There are 32 solved questions here: ten figure series, five analogies, five odd-one-out questions, eight mirror images and four water images. They are a step harder than the ones in the concept sections. Most of the series have two moving parts and five problem figures. In some, a part moves one way round the box and turns the other way, or moves one place and then two places by turns. The analogies use a 135° turn, a flip in a flat mirror, a swap of black and white, and shapes that change places or lose a side. The odd-one-out questions ask you to count sides, to look for a line of symmetry, or to spot one mirror image among turned figures. The mirror and water questions have four parts or a frame, and the combinations run to six or seven characters.
The habits have not changed. In a series, follow one part at a time and say its step in words. In an analogy, put the change into one sentence before you look at the third figure. In an odd-one-out question, test one property at a time on all four figures. In a mirror question, swap only left and right for an upright mirror, or only top and bottom for a flat mirror or water, and start with the one-edge check.
Try each question yourself before you read its answer. When you get one wrong, find the part you misread, not just the option you chose. The wrong options are built from exactly those slips: a part one place short, a turn the wrong way, a part moved across but not flipped, a character left unflipped.
Keep the targets from the last section in mind: 30–45 seconds for a figure series, 30–40 for an analogy or an odd-one-out question, 20–30 for the mirror image of a figure or a water image, and 15–25 for a combination in a mirror. Several of these will take longer the first time. Mark them, and try them again after a few days without looking at the answers.
Solved Questions
Question 1
Select the figure that will replace the question mark (?) in the following figure series.
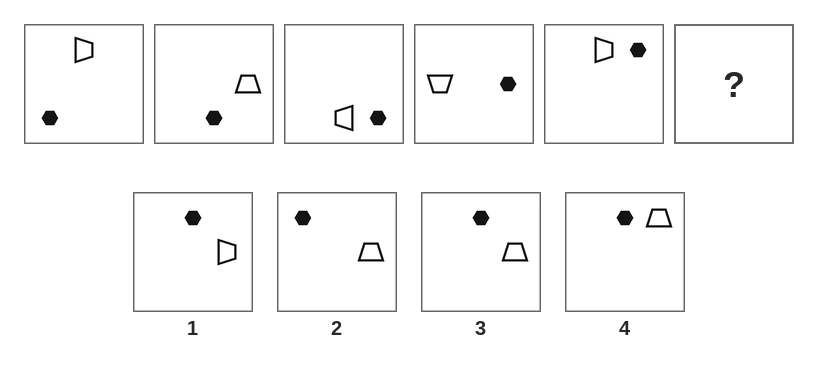
(a) Figure 1 (b) Figure 2 (c) Figure 3 (d) Figure 4
Answer. There are three changes here, so take them one at a time.
The black hexagon is the easy one: bottom-left, bottom-middle, bottom-right, right-middle, top-right. It creeps one place anticlockwise each time, so next it is at the top-middle. Figure 2 has it at the top-left, two places on, so it goes.
Now the place of the trapezium: top-middle, right-middle, bottom-middle, left-middle, top-middle. That is two places clockwise each time, so next it is at the right-middle. Figure 4 has it at the top-right, only one place on.
Last, the way the trapezium faces. Its narrow end faces right, up, left, down and right: a quarter turn anticlockwise each time, even though the trapezium itself travels clockwise. So next the narrow end faces up. Figure 1 still has it facing right, as if it had not turned at all. Figure 3 has all three right.
A quick check: the trapezium repeats every four steps, so in the sixth figure it should look exactly as it does in the second, and it does. So the answer is (c) Figure 3.
Question 2
Select the figure from among the given options that can replace the question mark (?) in the following series.
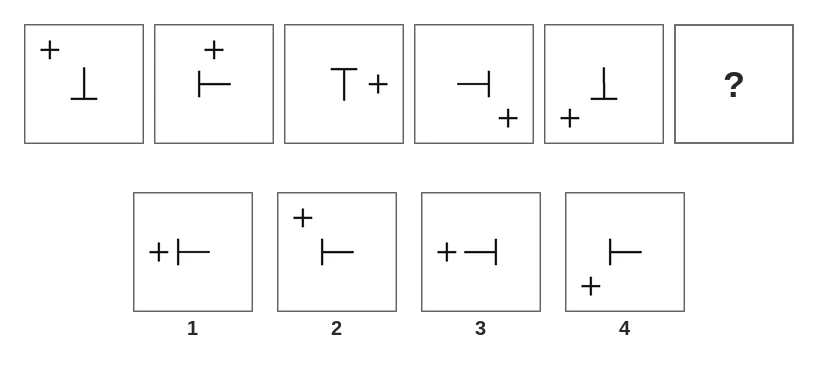
(a) Figure 1 (b) Figure 2 (c) Figure 3 (d) Figure 4
Answer. Follow the plus first. From the top-left to the top-middle is one place, from the top-middle to the right-middle is two, then one to the bottom-right, then two to the bottom-left. The steps go 1, 2, 1, 2, so the next step is 1, and the plus goes to the left-middle. Figure 2 moves it two places, to the top-left, as if the steps had stayed at 2. Figure 4 leaves it at the bottom-left.
Now the tee in the middle. Its bar is at the bottom, then on the left, at the top, on the right and at the bottom again: a quarter turn clockwise each time. So next the bar is on the left. Figure 3 has the bar on the right.
With five problem figures the 1, 2 pattern shows twice, so you can trust it. Only Figure 1 has the plus at the left-middle and the bar on the left. So the answer is (a) Figure 1.
Question 3
Which figure should replace the question mark (?) if the series were to be continued?
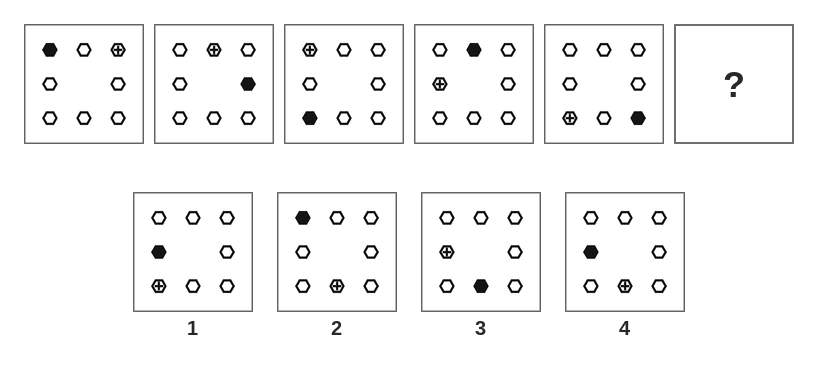
(a) Figure 1 (b) Figure 2 (c) Figure 3 (d) Figure 4
Answer. All eight hexagons stay where they are. Only the black fill and the little plus move, so follow them separately.
Black: top-left, right-middle, bottom-left, top-middle, bottom-right. On the clock face that is three places clockwise each time. Three more places from the bottom-right are the bottom-middle, the bottom-left and the left-middle. Figure 2 has the black at the top-left, four places on, so it goes.
The plus: top-right, top-middle, top-left, left-middle, bottom-left. One place anticlockwise each time, so next it is in the hexagon at the bottom-middle. Figure 1 leaves the plus at the bottom-left. Figure 3 uses the right two places but the wrong way round, with the black at the bottom-middle and the plus at the left-middle. Only Figure 4 has the black hexagon at the left-middle and the plus at the bottom-middle. So the answer is (d) Figure 4.
Question 4
Select the figure that will replace the question mark (?) in the following figure series.
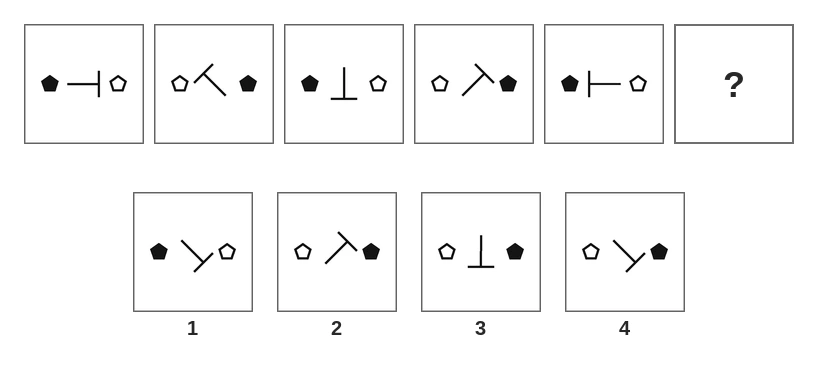
(a) Figure 1 (b) Figure 2 (c) Figure 3 (d) Figure 4
Answer. The pentagons are the quick part. The black one is on the left, then on the right, then on the left, and so on. The fifth figure has it on the left, so the sixth has it on the right. Figure 1 keeps it on the left, so it goes.
Now the tee, on the clock face. Its bar faces right, then up-left, then down, then up-right, then left. From right to up-left is 135° anticlockwise, three marks of 45°, and every later step is the same. So from left, 135° more anticlockwise brings the bar to down-right. Figure 2 has it facing up-right, which is 135° clockwise, the wrong way. Figure 3 has it facing straight down, a turn of only 90°.
A check: four turns of 135° make 540°, which is half a turn more than a full round. So the bar in the fifth figure should face the opposite way to the first one. Right in the first, left in the fifth: it does. Only Figure 4 is left. So the answer is (d) Figure 4.
Question 5
Select the figure from among the given options that can replace the question mark (?) in the following series.
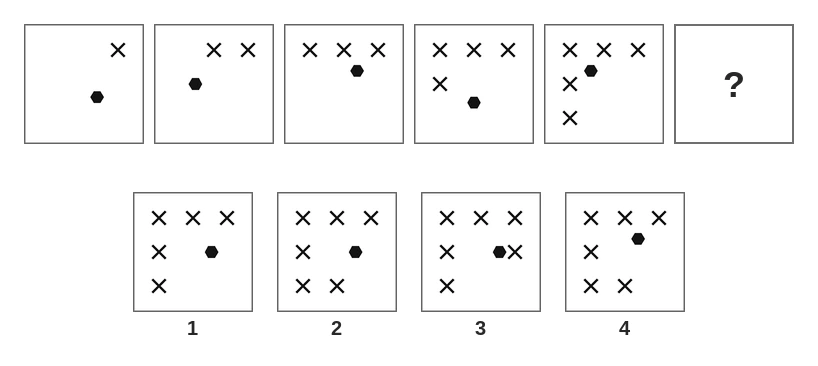
(a) Figure 1 (b) Figure 2 (c) Figure 3 (d) Figure 4
Answer. Two separate things happen here: crosses round the edge, and a small black hexagon inside.
The crosses: the first is at the top-right, and each new one comes at the next place anticlockwise, the top-middle, the top-left, the left-middle and the bottom-left. So the sixth figure gets a new cross at the bottom-middle and has six crosses in all. Figure 1 has only five. Figure 3 has six, but its new cross is at the right-middle, on the clockwise side.
The hexagon moves round a smaller ring of eight places inside: bottom-right, left-middle, top-right, bottom-middle, top-left. That is three places clockwise each time. Three more from the top-left are the top-middle, the top-right and the right-middle. Figure 4 has the hexagon at the top-right, only two places on. Figure 2 has the new cross at the bottom-middle and the hexagon at the right-middle. So the answer is (b) Figure 2.
Question 6
Which figure should replace the question mark (?) if the series were to be continued?
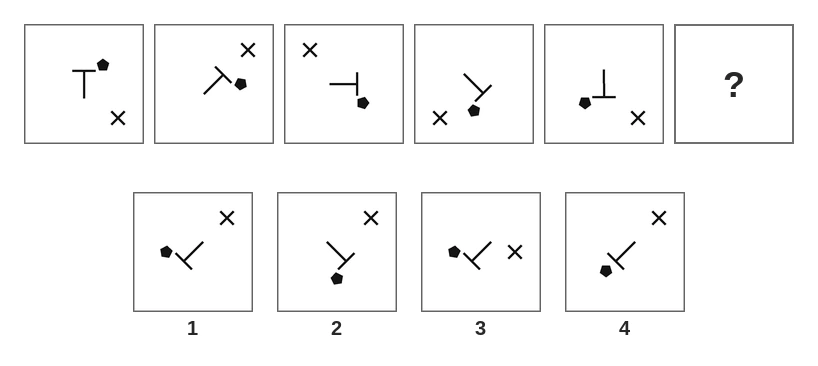
(a) Figure 1 (b) Figure 2 (c) Figure 3 (d) Figure 4
Answer. Look at the tee and the black pentagon together. In every figure the pentagon sits just clockwise of the bar of the tee, so the two turn as one piece. The bar faces up, up-right, right, down-right and down: 45° clockwise each time. So next the bar faces down-left, and the pentagon sits at the left-middle, just clockwise of it.
The cross goes bottom-right, top-right, top-left, bottom-left, bottom-right. That is two places anticlockwise each time, so next it is at the top-right.
Figure 2 has the tee and the pentagon turned back by 45° instead of on by 45°. Figure 3 has the cross at the right-middle, one place short. Figure 4 turns the tee but leaves the pentagon at the bottom-left. Only Figure 1 has the bar facing down-left, the pentagon at the left-middle and the cross at the top-right. So the answer is (a) Figure 1.
Question 7
Select the figure that will replace the question mark (?) in the following figure series.
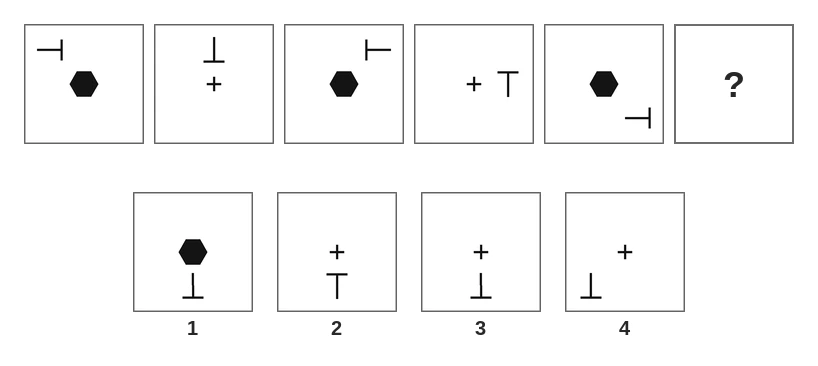
(a) Figure 1 (b) Figure 2 (c) Figure 3 (d) Figure 4
Answer. Three changes, so three checks.
The centre first: black hexagon, plus, black hexagon, plus, black hexagon. They take turns, so the sixth figure has the plus. Figure 1 has the hexagon, so it goes.
The place of the tee: top-left, top-middle, top-right, right-middle, bottom-right. One place clockwise each time, so next it is at the bottom-middle. Figure 4 has it at the bottom-left, two places on.
The bar of the tee: right, down, left, up, right. A quarter turn clockwise each time. This tee moves only 45° round the box but turns 90°, so it does not keep the same face to the centre. Do not guess the direction from where it stands: count the turns. After right comes down. Figure 2 has the bar facing up. Figure 3 has the plus in the middle and the tee at the bottom-middle with its bar facing down. So the answer is (c) Figure 3.
Question 8
Select the figure from among the given options that can replace the question mark (?) in the following series.
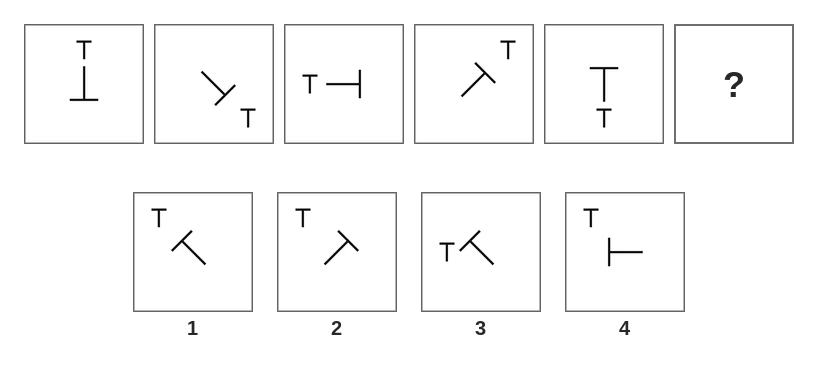
(a) Figure 1 (b) Figure 2 (c) Figure 3 (d) Figure 4
Answer. Two tees, two rules. Keep them apart.
The small tee never turns: it stands upright in every figure. It only moves: top-middle, bottom-right, left-middle, top-right, bottom-middle. That is three places clockwise each time, so next it is at the top-left. Figure 3 has it at the left-middle, two places on.
The big tee stays in the middle and turns. Its bar faces down, down-right, right, up-right and up: 45° anticlockwise each time. So next it faces up-left. Figure 2 has it facing up-right, which is turning back the other way. Figure 4 has it facing left, a turn of 90°.
Only Figure 1 has the small tee at the top-left and the bar of the big tee facing up-left. So the answer is (a) Figure 1.
Question 9
Which figure should replace the question mark (?) if the series were to be continued?
(a) Figure 1 (b) Figure 2 (c) Figure 3 (d) Figure 4
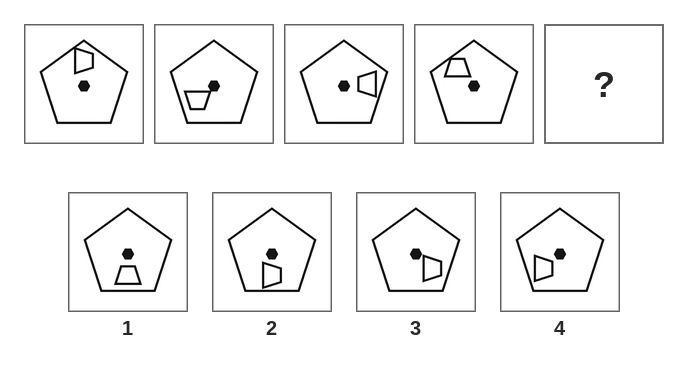
Answer. The pentagon frame and the black hexagon in the middle never change. Only the small trapezium moves, and it does two things.
Its place: top-middle, bottom-left, right-middle, top-left. Count on the clock face: from the top-middle to the bottom-left is three places anticlockwise, and so is every step after it. Three more places anticlockwise from the top-left are the left-middle, the bottom-left and the bottom-middle. So next it is at the bottom-middle. Figure 3 has it at the bottom-right, one place too far, and Figure 4 has it at the bottom-left, one place short.
Its narrow end: right, down, left, up. A quarter turn clockwise each time, even though the trapezium travels anticlockwise. So next the narrow end faces right. Figure 1 has the right place, but its narrow end still faces up, as if it had not turned.
That is the trap in this question: the part moves one way and turns the other way, so track the two separately. Figure 2 has the trapezium at the bottom-middle with its narrow end facing right. So the answer is (b) Figure 2.
Question 10
Select the figure that will replace the question mark (?) in the following figure series.
(a) Figure 1 (b) Figure 2 (c) Figure 3 (d) Figure 4
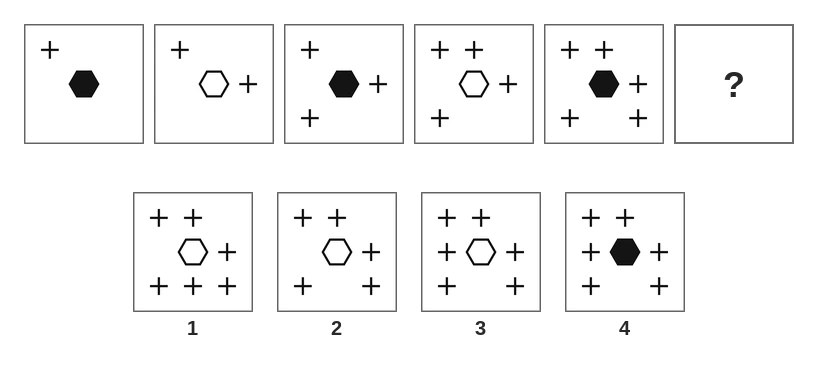
Answer. Count first: one plus, then two, three, four, five. So the sixth figure has six plus signs, and Figure 2, with five, goes.
Now find where the new plus goes. The plus signs come in at the top-left, the right-middle, the bottom-left, the top-middle and the bottom-right. Each new one is three places clockwise from the one added just before it. Three places clockwise from the bottom-right is the left-middle. Figure 1 puts the new plus at the bottom-middle, only one place on.
The hexagon in the middle is black, plain, black, plain, black, so the sixth one is plain. Figure 4 has it black. Figure 3 has six plus signs, the new one at the left-middle, round a plain hexagon. So the answer is (c) Figure 3.
Question 11
Select the option figure that is related to the third figure in the same way as the second figure is related to the first figure.
(a) Figure 1 (b) Figure 2 (c) Figure 3 (d) Figure 4
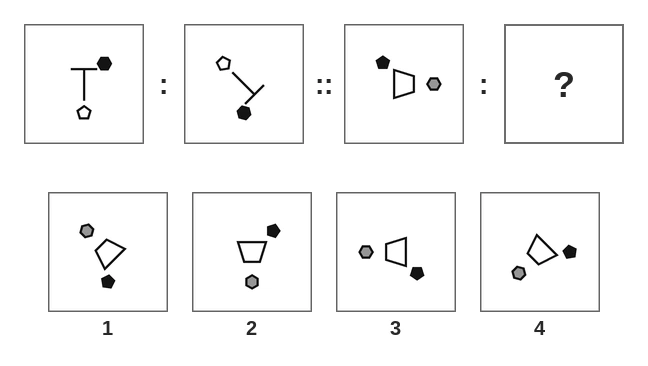
Answer. Say the change first. The bar of the tee goes from up to down-right, which is 135° clockwise. The black hexagon goes from the top-right to the bottom-middle, three places clockwise, which is also 135°. The plain pentagon goes from the bottom-middle to the top-left, again three places clockwise. So the whole figure has turned 135° clockwise.
Now turn the third figure the same way. The black pentagon at the top-left goes three places clockwise, to the right-middle. The grey hexagon at the right-middle goes to the bottom-left. The narrow end of the trapezium faces right, so after 135° clockwise it faces down-left.
Figure 1 is turned 135° the other way: its black pentagon is at the bottom-middle. Figure 2 is turned only 90° and Figure 3 is turned 180°, so in both the black pentagon is in the wrong place. Only Figure 4 has the black pentagon at the right-middle and the grey hexagon at the bottom-left. So the answer is (d) Figure 4.
Question 12
Select the option figure that is related to the third figure in the same way as the second figure is related to the first figure.
(a) Figure 1 (b) Figure 2 (c) Figure 3 (d) Figure 4
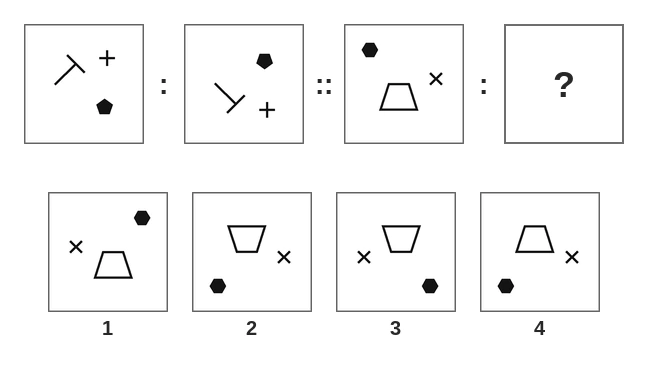
Answer. Compare the first two figures. The plus goes from the top-right to the bottom-right, and the black pentagon goes from the bottom-right to the top-right, with its point now facing down. The tee moves from the upper left to the lower left, and its bar turns from up-right to down-right. Everything has swapped top and bottom and stayed on its own side, left or right. That is the image in a flat mirror.
Do the same to the third figure. The black hexagon at the top-left goes to the bottom-left. The trapezium in the lower left moves up, and its narrow end, which faces up, now faces down. The cross on the right stays on the right.
Figure 1 is the left to right flip, with its hexagon at the top-right. Figure 3 is the figure turned 180°, with the hexagon at the bottom-right. Figure 4 has moved the trapezium up but left its narrow end facing up. So the answer is (b) Figure 2.
Question 13
Select the option figure that is related to the third figure in the same way as the second figure is related to the first figure.
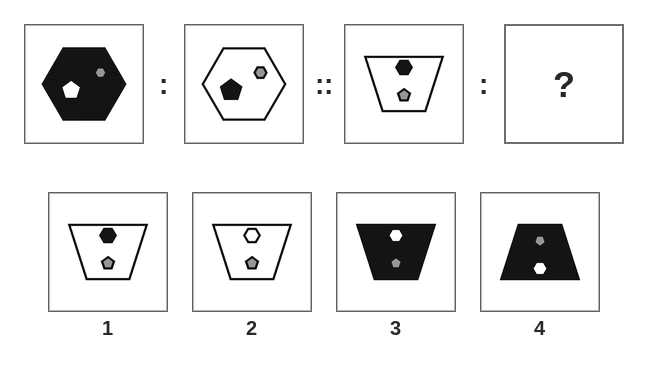
(a) Figure 1 (b) Figure 2 (c) Figure 3 (d) Figure 4
Answer. From the first figure to the second, the big hexagon goes from black to white and the pentagon from white to black. The small grey hexagon stays grey. So the rule is: black and white swap, and grey is left alone.
In the third figure the white trapezium becomes black and the black hexagon becomes white. The grey pentagon stays grey. Nothing moves or turns.
Figure 1 is the third figure copied as it is, with nothing swapped. Figure 2 has changed only the hexagon and left the trapezium white. Figure 4 has the right shading but is upside down: its narrow end faces up and the hexagon is at the bottom. Figure 3 has a black trapezium with its narrow end down, a white hexagon near the top and the grey pentagon below it. So the answer is (c) Figure 3.
Question 14
Select the option figure that is related to the third figure in the same way as the second figure is related to the first figure.
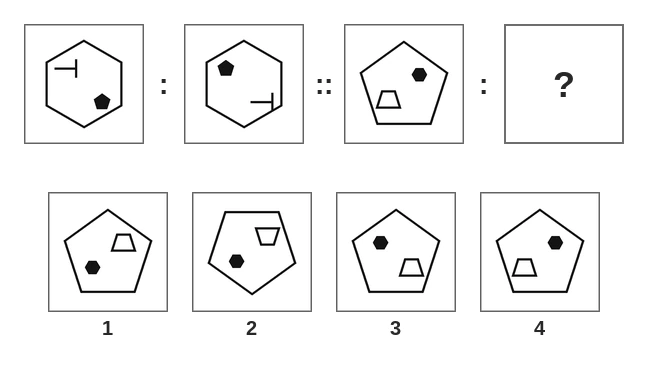
(a) Figure 1 (b) Figure 2 (c) Figure 3 (d) Figure 4
Answer. Look carefully at the first pair. The tee and the black pentagon have changed places, but the tee still points right and the pentagon still has its point up. The frame does not change. If the figure had been turned 180°, the tee would now point left. So the rule is a plain swap of the two small shapes.
In the third figure the trapezium goes to the upper right, where the black hexagon was, with its narrow end still facing up, and the black hexagon goes to the lower left.
Figure 2 is the third figure turned 180°: its frame now points down and the trapezium faces down. Figure 3 is its mirror image, with the trapezium at the lower right. Figure 4 is the third figure copied with nothing swapped. Only Figure 1 has the two shapes swapped, each still facing the way it did. So the answer is (a) Figure 1.
Question 15
Select the option figure that is related to the third figure in the same way as the second figure is related to the first figure.
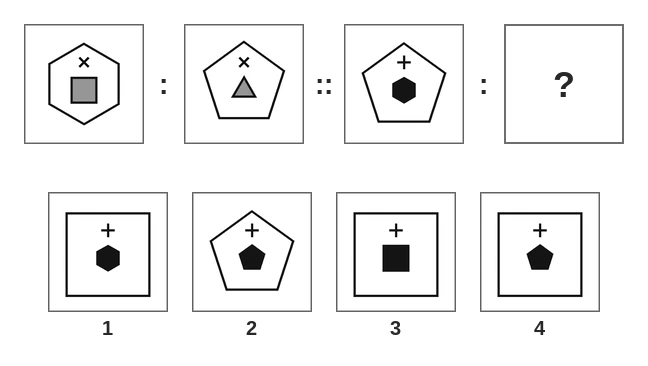
(a) Figure 1 (b) Figure 2 (c) Figure 3 (d) Figure 4
Answer. In the first pair the hexagon becomes a pentagon, the grey square becomes a grey triangle, and the small cross stays as it is. Each straight-sided shape loses one side. The cross has no sides to lose, so it does not change.
Apply this to the third figure. The outer pentagon becomes a square, the black hexagon inside becomes a black pentagon, and the plus at the top stays a plus.
Figure 1 has changed only the outer shape and Figure 2 only the inner one. Figure 3 has taken two sides off the inner shape, so the hexagon has become a square. Figure 4 has a square round a black pentagon, with the plus above it. So the answer is (d) Figure 4.
Question 16
Three of the following four figures are alike in a certain way and thus form a group. Which is the one that does NOT belong to that group?
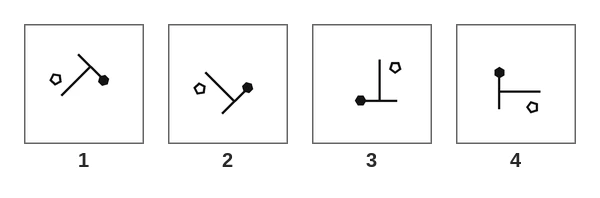
(a) Figure 1 (b) Figure 2 (c) Figure 3 (d) Figure 4
Answer. Every figure has the same three parts: a tee, a small black hexagon and a small pentagon. Counting and shading will not split them, so check whether one figure is a mirror image.
Use the walk test on each tee, walking along the stem from its foot to its bar. In Figure 1, Figure 3 and Figure 4 the black hexagon is on your right, near the bar, and the pentagon is on your left, near the foot. In Figure 2 it is the other way round: the hexagon is on your left and the pentagon on your right.
So three figures are one figure turned, and Figure 2 is its mirror image.
Time check: one walk per figure, about 30 seconds. So the answer is (b) Figure 2.
Question 17
Three of the following four figures are alike in a certain way and thus form a group. Which is the one that does NOT belong to that group?
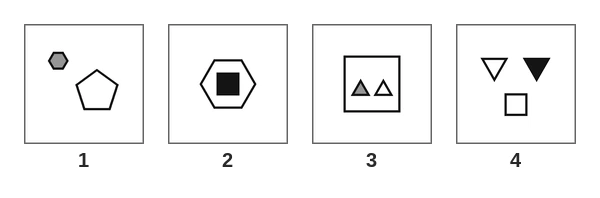
(a) Figure 1 (b) Figure 2 (c) Figure 3 (d) Figure 4
Answer. The shapes are all different, so look for a number. Count every side of every shape in each figure.
Figure 1 has a pentagon and a hexagon, 5 + 6 = 11 sides. Figure 2 has a square inside a hexagon, 6 + 4 = 10. Figure 3 has a square with two triangles inside it, 4 + 3 + 3 = 10. Figure 4 has two triangles and a square, 3 + 3 + 4 = 10.
Three figures have ten sides in all, and Figure 1 has eleven. The number of shapes, the shading and the shapes drawn inside a frame all split the figures two and two, so none of those is the rule. So the answer is (a) Figure 1.
Question 18
Three of the following four figures are alike in a certain way and thus form a group. Which is the one that does NOT belong to that group?
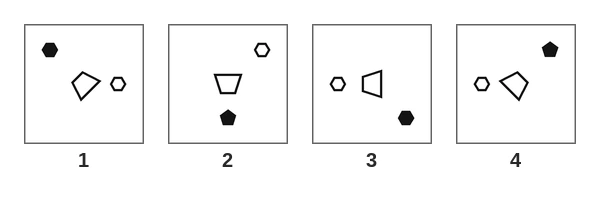
(a) Figure 1 (b) Figure 2 (c) Figure 3 (d) Figure 4
Answer. Each figure has a trapezium in the middle and two small shapes at the edge, one black and one plain. Test one property at a time. The black shape is a hexagon in two figures and a pentagon in two, so that is not it. The trapezium faces a corner in two figures and the middle of a side in two, so that is not it either.
Now see what the narrow end of the trapezium faces. In Figure 1 it faces the black hexagon at the top-left, in Figure 2 the black pentagon at the bottom-middle, and in Figure 4 the black pentagon at the top-right. In Figure 3 it faces the plain hexagon on the left, while the black hexagon sits in the bottom-right corner. Figure 3 does not belong. So the answer is (c) Figure 3.
Question 19
Three of the following four figures are alike in a certain way and thus form a group. Which is the one that does NOT belong to that group?
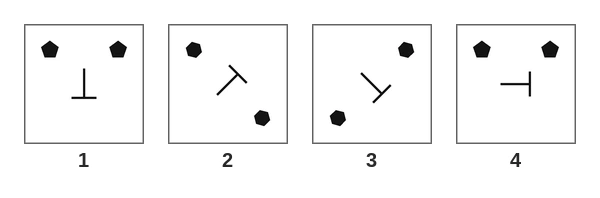
(a) Figure 1 (b) Figure 2 (c) Figure 3 (d) Figure 4
Answer. Every figure has a tee in the middle and two black shapes in the corners, so the counts and the shading are the same everywhere. Look for a line that folds the figure onto itself.
In Figure 1 the pentagons are at the top-left and the top-right, and the bar of the tee is at the bottom. An upright line through the middle folds it exactly. In Figure 2 the hexagons are at the top-left and the bottom-right, and the tee points up-right, along the slanting line from the bottom-left corner to the top-right corner. Fold along that line and the two hexagons meet. Figure 3 works the same way with the other slanting line.
Figure 4 has its pentagons at the top-left and the top-right, just like Figure 1, but its tee points right, across the upright line. No line folds it onto itself. Figure 4 is the only figure without a line of symmetry. So the answer is (d) Figure 4.
Question 20
Three of the following four figures are alike in a certain way and thus form a group. Which is the one that does NOT belong to that group?
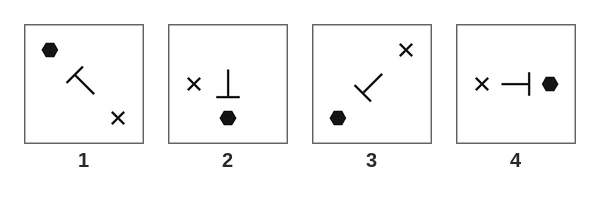
(a) Figure 1 (b) Figure 2 (c) Figure 3 (d) Figure 4
Answer. In every figure the tee in the middle points at the black hexagon, so that is not the rule. Look at where the cross is compared with the hexagon.
In Figure 1 the hexagon is at the top-left and the cross at the bottom-right. In Figure 3 the hexagon is at the bottom-left and the cross at the top-right. In Figure 4 the hexagon is at the right-middle and the cross at the left-middle. Each time the cross is four places away, at the opposite place of the box, right behind the tee. In Figure 2 the hexagon is at the bottom-middle and the cross at the left-middle, only two places away.
Figure 2 is the odd one. So the answer is (b) Figure 2.
Question 21
Select the correct mirror image of the given figure when the mirror is placed at MN as shown.
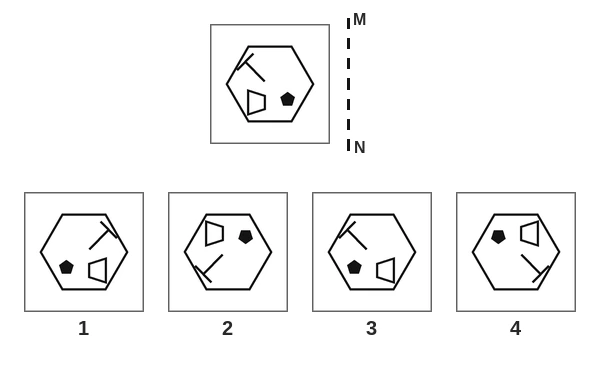
(a) Figure 1 (b) Figure 2 (c) Figure 3 (d) Figure 4
Answer. The hexagon frame looks the same in any mirror, so leave it and work on the three small parts. The mirror is on the right, so left and right swap and top and bottom stay.
One edge: the tee is in the upper part of the figure, so it must stay up there. Figure 2 and Figure 4 have the tee at the bottom, so both go. Figure 2 is the image in a flat mirror and Figure 4 is the figure turned 180°.
Now flip each part. The tee moves to the upper right, and its bar, which points up-left, now points up-right. The black pentagon moves from the lower right to the lower left. The trapezium moves from the lower left to the lower right, and its narrow end, which faces right, now faces left.
Figure 3 has moved the pentagon and the trapezium across but left the tee where it was, at the upper left. Only Figure 1 has every part flipped. So the answer is (a) Figure 1.
Question 22
Select the correct mirror image of the given figure when the mirror is placed at MN as shown.
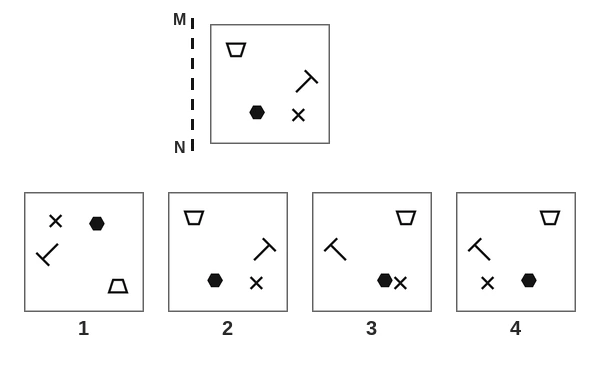
(a) Figure 1 (b) Figure 2 (c) Figure 3 (d) Figure 4
Answer. The mirror is on the left: left and right swap, top and bottom stay.
Top edge: only the trapezium is near the top, at the top-left, with its narrow end down. In the image it is at the top-right with its narrow end still down. Figure 1 has it at the bottom, so it is the figure turned 180°. Figure 2 still has it at the top-left, so it is the figure copied as it is.
Between Figure 3 and Figure 4, look at the bottom row. In the figure the black hexagon is just left of centre and the cross is near the right edge. In the image the hexagon is just right of centre and the cross is near the left edge. Figure 3 has moved the hexagon across but left the cross on the right. Figure 4 has the cross on the left, and its tee is at the left-middle pointing up-left. So the answer is (d) Figure 4.
Question 23
Select the correct mirror image of the given figure when the mirror is placed at MN as shown.
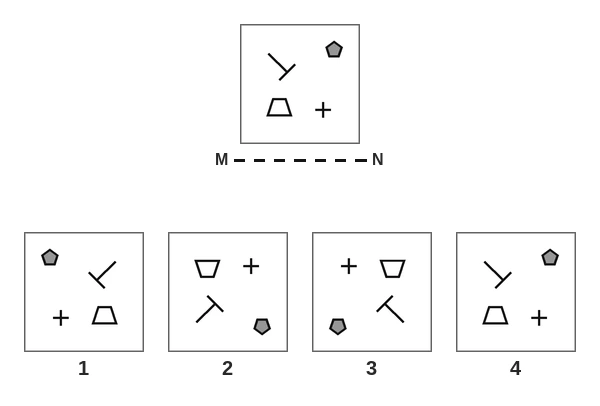
(a) Figure 1 (b) Figure 2 (c) Figure 3 (d) Figure 4
Answer. MN is below, so top and bottom swap and left and right stay.
Left edge: the tee and the trapezium are on the left, so they stay on the left. Figure 1 has them on the right, so it goes. Figure 3 also has them on the right, and it is the figure turned 180°.
Now swap top and bottom. The tee goes down, and its bar, which points down-right, now points up-right. The trapezium comes up, and its narrow end, which faces up, now faces down. The grey pentagon goes to the bottom-right with its point down, and the plus goes to the top-right.
One corner: the tee is at the top-left, so in the image it must be at the bottom-left. Figure 4 still has it at the top-left, so it is the figure copied as it is. Figure 2 has every part right. So the answer is (b) Figure 2.
Question 24
Select the correct mirror image of the given figure when the mirror is placed at MN as shown.
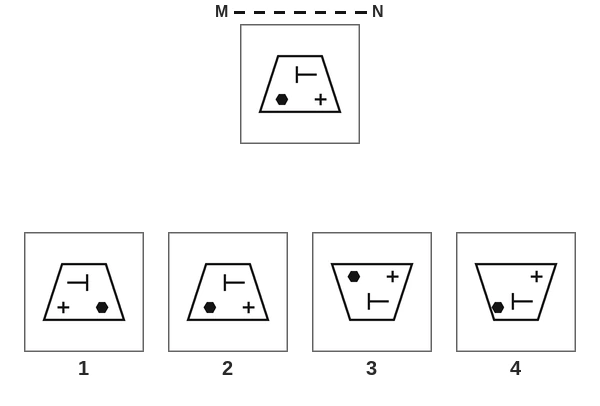
(a) Figure 1 (b) Figure 2 (c) Figure 3 (d) Figure 4
Answer. MN is above the figure, so it is a flat mirror: top and bottom swap, and left and right stay.
The frame is the quickest check. Its narrow side is at the top, so in the image the narrow side is at the bottom. Figure 1 and Figure 2 still have the narrow side at the top, so both go. Figure 1 is the left to right flip and Figure 2 is the figure as it is.
Now the small parts. The black hexagon is at the bottom-left, so it goes to the top-left. The plus goes from the bottom-right to the top-right. The tee goes from the top half to the bottom half, and its bar still faces left, because a tee pointing left looks the same upside down. Figure 4 has the frame flipped but the hexagon still at the bottom. So the answer is (c) Figure 3.
Question 25
Select the correct mirror image of the given combination when the mirror is placed at MN as shown below.
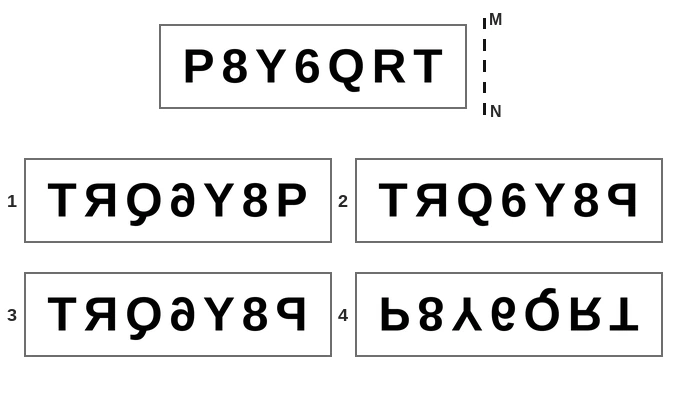
(a) Figure 1 (b) Figure 2 (c) Figure 3 (d) Figure 4
Answer. Reverse, then flip. In reverse order P8Y6QRT is T, R, Q, 6, Y, 8, P. Now flip each one left to right. The T, the Y and the 8 look the same in an upright mirror, so they need no checking. The R must face left, the Q must have its tail on the left, the 6 must be backwards, and the P must have its bowl on the left.
Figure 4 is upside down, so it goes at once. The other three all start with T and a backwards R, so check the rest. Figure 1 has a normal P at the end. Figure 2 has a normal 6 and a normal Q. Only Figure 3 has all four of them flipped.
Time check: the characters that look the same in a mirror cut the work almost in half, so this takes about 20 seconds. So the answer is (c) Figure 3.
Question 26
Select the correct mirror image of the given combination when the mirror is placed at MN as shown below.
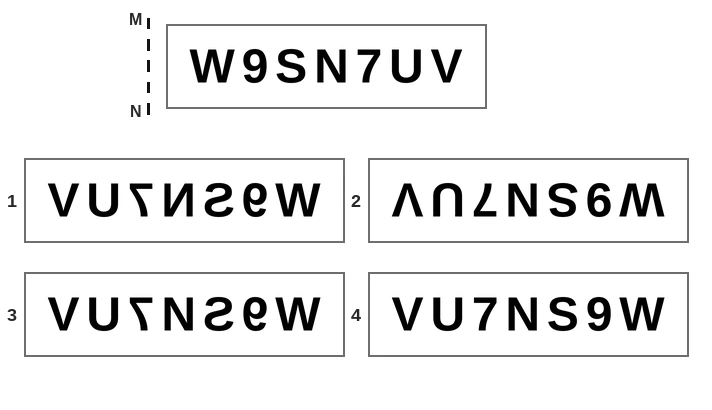
(a) Figure 1 (b) Figure 2 (c) Figure 3 (d) Figure 4
Answer. A mirror on the left works exactly like a mirror on the right: reverse, then flip. In reverse order W9SN7UV is V, U, 7, N, S, 9, W. The V, the U and the W look the same in an upright mirror. The 7, the N, the S and the 9 must all face the other way.
Figure 4 has the reverse order with nothing flipped. Figure 2 is upside down: it is the combination turned round by 180°. Figure 3 is very close, but its N is the normal way round. Figure 1 has the 7, N, S and 9 all reversed. So the answer is (a) Figure 1.
Question 27
Select the correct mirror image of the given combination when the mirror is placed at MN as shown below.
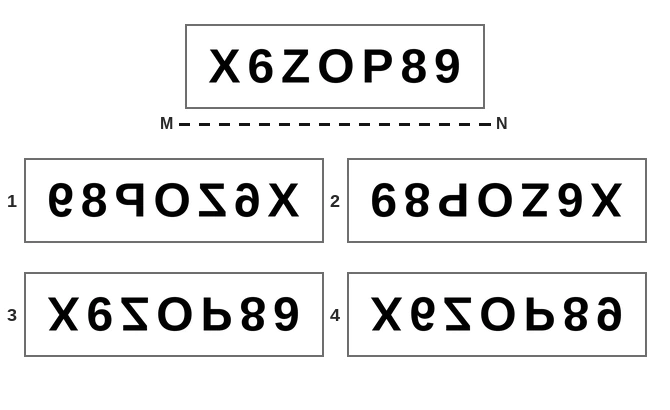
(a) Figure 1 (b) Figure 2 (c) Figure 3 (d) Figure 4
Answer. MN is below, so this is a flat mirror. Keep the order and turn each character upside down. The X, the O and the 8 look the same upside down, so check the Z, the P, the 6 and the 9.
Figure 1 and Figure 2 both read from the right, so they go. Figure 1 is the image in an upright mirror, and Figure 2 is the combination turned round, which has made the 6 look like a 9 and the 9 look like a 6. Figure 3 keeps the order, but its 6 and its 9 are still the right way up. In Figure 4 the P has its bowl at the bottom, the 6 has its loop at the top and the 9 has its loop at the bottom. So the answer is (d) Figure 4.
Question 28
Select the correct mirror image of the given combination when the mirror is placed at MN as shown below.
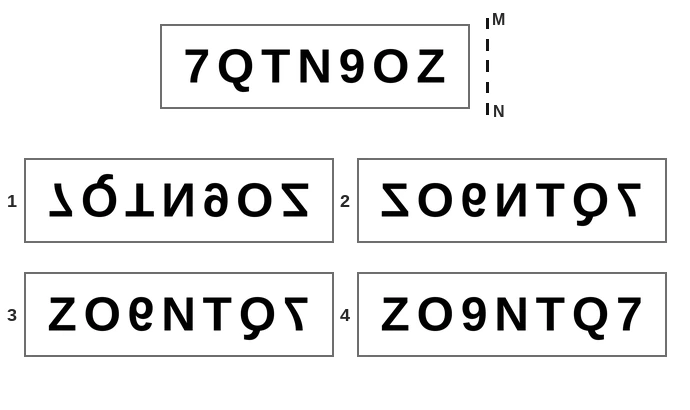
(a) Figure 1 (b) Figure 2 (c) Figure 3 (d) Figure 4
Answer. Reverse, then flip. In reverse order 7QTN9OZ is Z, O, 9, N, T, Q, 7. The O and the T look the same in an upright mirror, and every other character must face the other way.
Check the first character: it must be a backwards Z. Figure 1 begins with a 7 turned upside down, so it is the water image. Figure 4 begins with a normal Z and has nothing flipped. Figure 3 begins with a normal Z too, and its N is also the normal way round. Only Figure 2 begins with a backwards Z and has the 9, the N, the Q and the 7 flipped as well. So the answer is (b) Figure 2.
Question 29
Select the correct water image of the given figure.
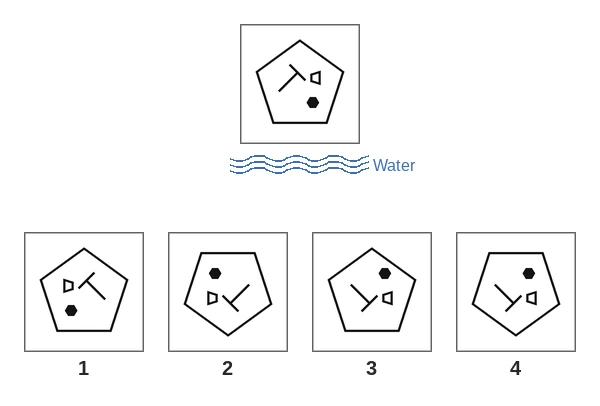
(a) Figure 1 (b) Figure 2 (c) Figure 3 (d) Figure 4
Answer. In water, top and bottom swap and left and right stay. The frame is a pentagon with its point up, so in water its point is down. Figure 1 and Figure 3 still have the point up, so both go. Figure 1 is the left to right flip, and Figure 3 has flipped the small parts but not the frame.
Left edge: the tee is on the left, so it stays on the left. Figure 2 has the tee on the right. It is the figure turned 180°, which also points the frame down, so the frame alone does not catch it.
Now check the parts in Figure 4. The black hexagon at the lower right has gone to the upper right. The trapezium at the upper right has gone to the lower right, still facing left. The bar of the tee pointed up-right, and in water it points down-right. So the answer is (d) Figure 4.
Question 30
Select the correct water image of the given figure.
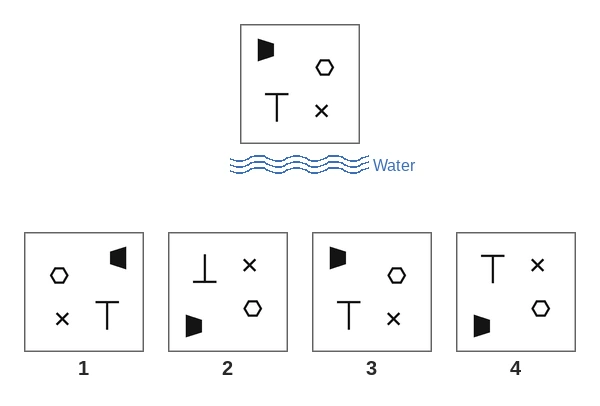
(a) Figure 1 (b) Figure 2 (c) Figure 3 (d) Figure 4
Answer. Water swaps top and bottom. Left edge first: the black trapezium and the tee are on the left, so they stay on the left. Figure 1 has them on the right.
One corner: the trapezium is in the top-left corner, so in water it is in the bottom-left corner. Figure 3 still has it at the top-left. It is the figure copied as it is.
One part: the tee at the bottom-left has its bar at the top. In water it moves to the top-left and its bar goes to the bottom. Figure 4 has the tee at the top-left but with its bar still at the top. In Figure 2 the bar of the tee is at the bottom, the cross is at the top-right and the hexagon is low on the right. So the answer is (b) Figure 2.
Question 31
Select the correct water image of the given combination.
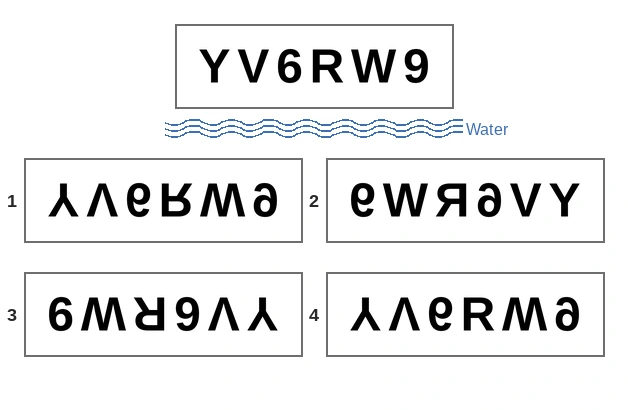
(a) Figure 1 (b) Figure 2 (c) Figure 3 (d) Figure 4
Answer. Water: keep the order and turn each character upside down. The Y and the V stand on their heads, the W becomes an M, and the R is turned over. The 6 gets its loop at the top with its tail still on the left, and the 9 gets its loop at the bottom.
Figure 2 reads from the right, so it is the mirror image. Figure 3 also reads from the right and shows a 6 at the front and a 9 in the middle, so the combination has been turned round. Figure 4 has the right order, but its R still stands the right way up, with the bowl at the top. Figure 1 has every character turned over. So the answer is (a) Figure 1.
Question 32
Select the correct water image of the given combination.
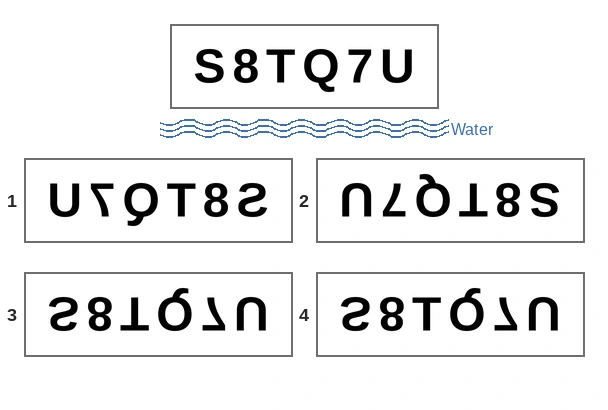
(a) Figure 1 (b) Figure 2 (c) Figure 3 (d) Figure 4
Answer. Water: keep the order S, 8, T, Q, 7, U and turn each one upside down. The 8 looks the same. The T stands on its bar, the U opens downwards, the 7 has its bar at the bottom, and the S and the Q are turned over.
Figure 1 and Figure 2 start with the U, so they are not water images: Figure 1 is the image in an upright mirror and Figure 2 is the combination turned round. Figure 4 has the right order, but its T is still standing the right way up. So the answer is (c) Figure 3.