
What "Embedded" Means
In an embedded figure question you get a small figure X and four bigger figures. One of the bigger figures has X hidden inside it, drawn with its own lines. You have to find that one. The question reads: "Select the option figure in which the given figure (X) is embedded as its part (rotation is NOT allowed)."
Three conditions
X is embedded in a figure only when all of these hold:
- Same size. Every line of X has the same length in the figure. A bigger or smaller copy does not count.
- Same direction. X may only slide. It may not be turned, and it may not be flipped into its mirror image. That is what "rotation is NOT allowed" means.
- Every line is there. Each line of X must be drawn in the figure. A line of the figure may run on past the end of X's line, and other lines may cross X, but no line of X may be missing.
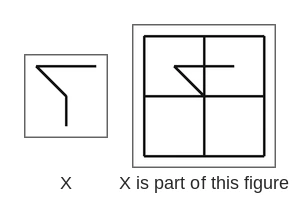
In the picture X is a level line with a short slant going down from its left end and a short upright line under the slant. In the big figure, X sits a little above the centre: its level line is drawn a quarter of the way down, its slant ends at the centre, and its upright line is part of the long upright middle line. That middle line runs on past X's end, which is allowed.
Measure in small squares
The figures are drawn on a grid of small squares, even when the grid is not shown. Read each line of X in those units: "two squares long, level", "one square long, slanting down to the right". Then you can check lengths in the options instead of guessing.
Solved Questions
Question 1
Select the option figure in which the given figure (X) is embedded as its part (rotation is NOT allowed).
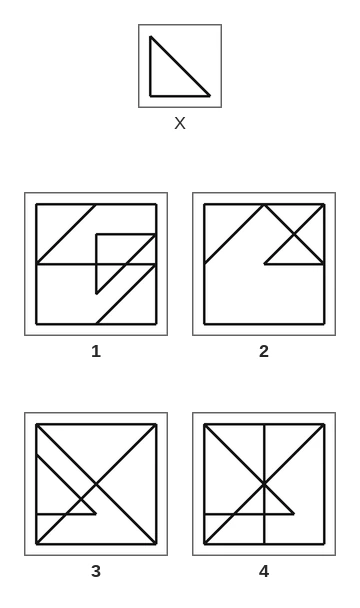
(a) Figure 1 (b) Figure 2 (c) Figure 3 (d) Figure 4
Answer. X is a right-angled triangle. Its square corner is at the bottom-left, and its slanting side runs from the top down to the right. Look for exactly that, at the same size and the same way round. In Figure 3 it sits on the left side: its upright line is part of the left side of the big square, the slanting line comes down from it, parallel to the diagonal from the top-left corner, and a short level line closes the triangle at the bottom. Figure 1 has a triangle with its square corner at the top-left, which is X turned. Figure 2 has its square corner at the bottom-right, which is X mirrored. Figure 4 has a triangle the right way round, but it is bigger than X, so it does not count. So the answer is (c) Figure 3.
Question 2
Select the option figure that contains the given figure (X) as its part (rotation is NOT allowed).
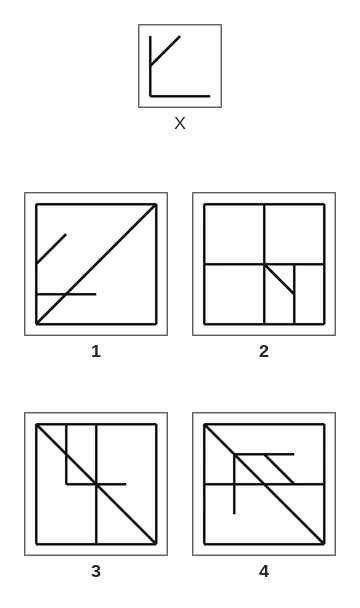
(a) Figure 1 (b) Figure 2 (c) Figure 3 (d) Figure 4
Answer. The most unusual part of X is the short slanting line that leaves the middle of the upright line and goes up to the right. Look for that first. In Figure 1 the left side of the square is X’s upright line, a level line runs in from it three-quarters of the way down, and from the middle of the upright line a short slant rises to the right, parallel to the long diagonal. Every line matches in length and direction. In Figure 2 the short slant is on the other side of its upright line, so that is X mirrored. Figure 4 has X turned on its side, and Figure 3 has the L shape with no slant at all. So the answer is (a) Figure 1.
How to Search
Looking at all four options at once and waiting for X to jump out is slow. Search with a plan.
Step 1: pick X's most unusual corner
Find the one part of X that is easy to spot: a slanting line meeting an upright line, a short tail, a small closed triangle, a point where three lines meet. Square corners of level and upright lines are poor choices, because every option is full of them.
Step 2: look for that corner in each option
Run through the four options looking only for that corner, the same way round. Often only one or two options have it.
Step 3: check every other line from there
Starting from the corner, trace X's other lines one by one. Check the direction and count the length in small squares. If any line is missing or too short, that option is out.
Use the lines that are already there
In the options, X usually shares some of its lines with the big figure: one side may be part of the outer square, or part of a diagonal, or part of a middle line. So when you look for X's slanting line, follow the long slanting lines of the figure too, not just the short ones.
Time check: an embedded figure question should take 30–40 seconds. If one option holds X cleanly, you can stop without checking the rest in detail.
Solved Questions: Searching for X
Question 3
Select the option figure in which the given figure (X) is embedded as its part (rotation is NOT allowed).
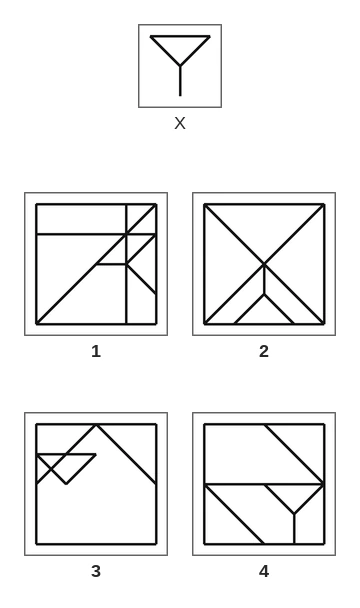
(a) Figure 1 (b) Figure 2 (c) Figure 3 (d) Figure 4
Answer. X looks like a glass: a level top, a V below it and a stem under the point of the V. In Figure 4 it sits in the bottom-right quarter. The right half of the middle level line is the top of the glass. The slanting line from the middle of the right side gives one arm of the V, a short slant from the centre gives the other arm, and the stem runs straight down to the bottom side. Figure 2 has the glass standing upside down, which is not allowed, and Figure 1 has it lying on its side. Figure 3 has the top and the V, but no stem. Time check: once you know what to look for, this takes about 30 seconds. So the answer is (d) Figure 4.
Question 4
Select the option figure that contains the given figure (X) as its part (rotation is NOT allowed).
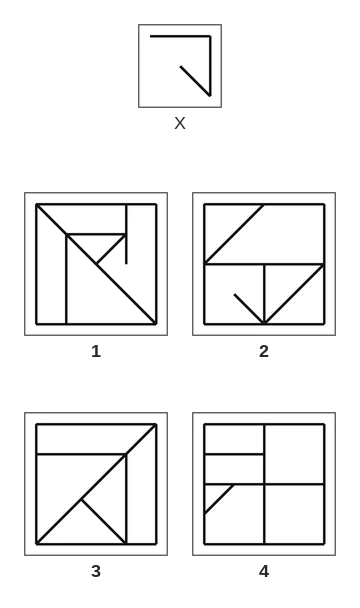
(a) Figure 1 (b) Figure 2 (c) Figure 3 (d) Figure 4
Answer. X is a level line with an upright line dropping from its right end, and a short slant going back up to the left from the bottom of that upright. The corner where the slant meets the upright is the part to look for. In Figure 2 it is in the bottom-left quarter. The left half of the middle level line is X’s top, an upright line drops from the centre of the square to the bottom side, and a short slant runs back up to the left from its foot. Figure 4 has the same shape facing the other way, with the upright on the left, so it is X mirrored. Figure 1 has X turned, and Figure 3 has the right shape but bigger. So the answer is (b) Figure 2.
Question 5
Select the option figure in which the given figure (X) is embedded as its part (rotation is NOT allowed).
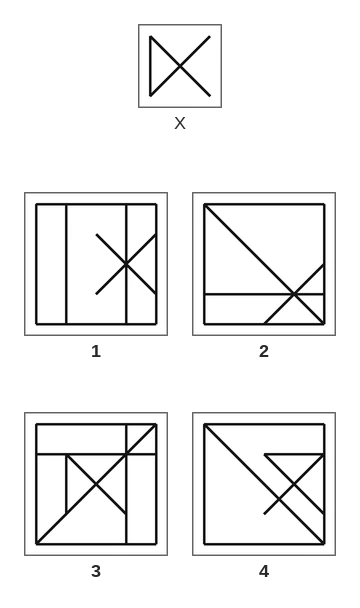
(a) Figure 1 (b) Figure 2 (c) Figure 3 (d) Figure 4
Answer. X is a cross of two slanting lines, with an upright line joining their two left ends. In Figure 3 the cross is at the centre of the square: the long diagonal from the bottom-left corner gives one of its lines, a shorter slant crosses it at the centre, and an upright line joins their left ends. Figure 2 has the upright line on the right of its cross, which is X mirrored. Figure 4 has the joining line across the top instead, which is X turned. In Figure 1 nothing joins the left ends of the cross: the only upright line touching its ends is the right side of the square, so this is X mirrored again. So the answer is (c) Figure 3.
Common Mistakes
The wrong options are built to look right at a glance. Almost always they hold a near miss of X:
- X turned. X is there, but turned a quarter turn or a half turn. Rotation is not allowed, so it does not count.
- X mirrored. X is there as its mirror image, with a slant going the other way or a tail on the other side.
- A line short. X is there except for one line, or one line is shorter than it should be.
- A different size. A copy of X that is bigger or smaller.
- An angle changed. One line of X leans the other way.
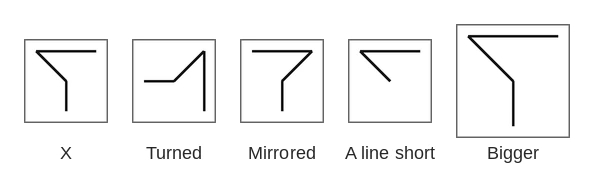
The picture shows X and four shapes that are not X. Turned a quarter turn, the long line stands upright and the stem points sideways. Mirrored, the slant goes down to the left from the right end. With a line short, the stem is missing. Bigger, every line is longer.
Why the unusual corner helps
A turned or mirrored copy of X has the same corner, but facing another way. If you fix in your head which way X's corner faces ("slant going down to the right from the left end of the level line"), the turned and mirrored copies drop out at once.
[SSC Tip] Before you choose, trace X once more in the option you picked, line by line. It takes five seconds and catches the "one line short" trap.
Solved Questions: Near Misses
Question 6
Select the option figure that contains the given figure (X) as its part (rotation is NOT allowed).
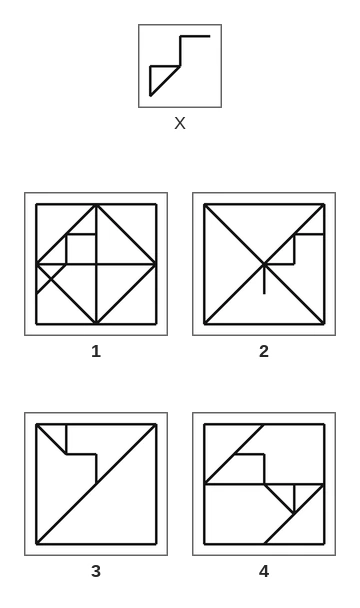
(a) Figure 1 (b) Figure 2 (c) Figure 3 (d) Figure 4
Answer. X is a little staircase of two steps, with a short slanting line from the bottom of the stairs to the corner of the first step. That slanting line is the unusual part, so look for a short slant inside a step. In Figure 1 the stairs start on the left side of the square: the left side and the middle level line make the first step, a short upright and a short level line make the second, and the short slant cuts across the first step. Figure 4 has the stairs climbing to the left, which is X mirrored. Figure 3 has them turned, and Figure 2 has the steps without the slant. So the answer is (a) Figure 1.
Question 7
Select the option figure in which the given figure (X) is embedded as its part (rotation is NOT allowed).
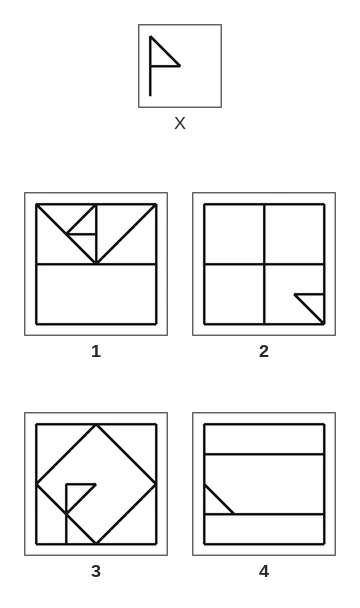
(a) Figure 1 (b) Figure 2 (c) Figure 3 (d) Figure 4
Answer. X is a small flag: an upright pole with a triangle at its top, on the right of the pole. The flag has a slanting top edge and a level bottom edge. In Figure 4 it sits at the bottom-left. The left side of the square is the pole, a short slant goes down to the right from the middle of the left side, and the level line three-quarters of the way down closes the flag. Figure 1 has the flag on the left of its pole, which is X mirrored, and Figure 2 has it upside down. In Figure 3 the flag’s slanting edge leans the other way, so one angle is different. So the answer is (d) Figure 4.
Question 8
Select the option figure that contains the given figure (X) as its part (rotation is NOT allowed).
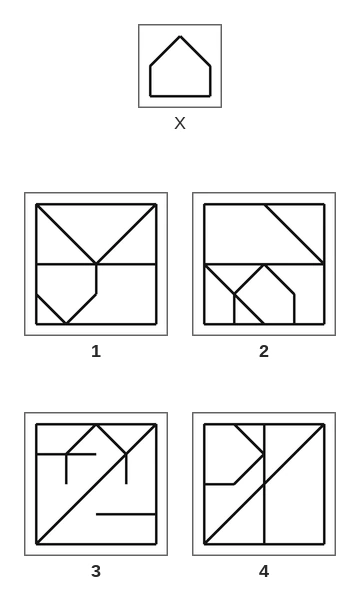
(a) Figure 1 (b) Figure 2 (c) Figure 3 (d) Figure 4
Answer. X is a house: a pointed roof, two short walls and a floor. In Figure 2 the house stands at the bottom middle of the square. Its floor is part of the bottom side, two short upright walls stand on it, and the roof comes to a point exactly at the centre of the square. Figure 1 has the house upside down and Figure 4 has it lying on its side. Figure 3 looks close, but its house has no floor, so one line is missing. So the answer is (b) Figure 2.
Question 9
Select the option figure in which the given figure (X) is embedded as its part (rotation is NOT allowed).
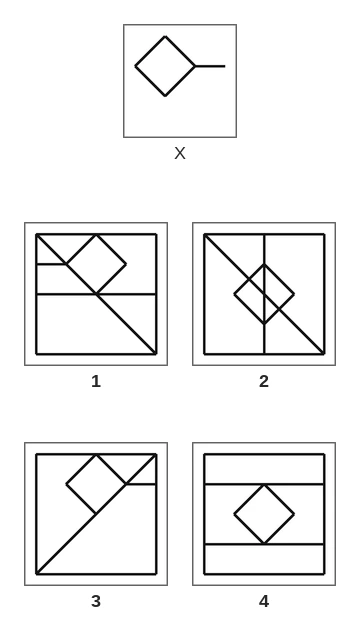
(a) Figure 1 (b) Figure 2 (c) Figure 3 (d) Figure 4
Answer. X is a small diamond with a tail going right from its right corner. In Figure 3 the diamond hangs from the middle of the top side of the square. Its lower-right edge is part of the slanting line from the top-right corner, and the tail runs from its right corner to the right side of the square, a quarter of the way down. Figure 2 has the tail pointing down, which is X turned, and Figure 1 has the tail on the left of its diamond, which is X mirrored. Figure 4 has a diamond of the right size but no tail. So the answer is (c) Figure 3.
The Reverse Type
Sometimes the roles swap. The big figure is given as X, and the four options are small figures. Exactly one of them is hidden in X. The question reads: "Select the option figure which is embedded in the given figure (rotation is NOT allowed)."
How to work it
- Take the options one at a time. For each, pick its unusual corner and look for it in X, the same way round.
- When you find the corner, check the option's other lines in X, with the same lengths.
- The same rules hold: same size, same direction, every line present. Lines of X may run on past the option's ends.
Common mistakes
The wrong options are usually the right shape turned or mirrored, so that X has the shape only the other way round. Another trap adds one extra line to the right shape, a line that X does not have in that place. So it is not enough that most of the option is in X: every line of it must be.
Solved Questions: The Reverse Type
Question 10
Select the option figure which is embedded in the given figure (rotation is NOT allowed).
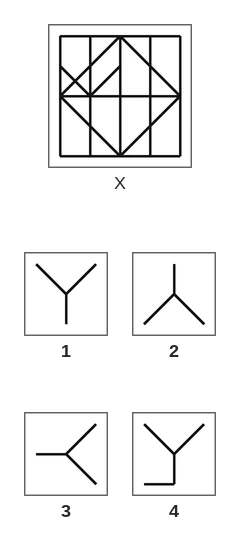
(a) Figure 1 (b) Figure 2 (c) Figure 3 (d) Figure 4
Answer. This time the big figure is X, and you check each small option in it. Figure 1 is a Y shape: an upright stem with two arms spreading up. In X it is on the left: the upright line a quarter of the way in gives the stem, and from the middle level line two short slants spread up, one to the left side of the square and one to the upright middle line. Figure 2 is the Y upside down, and X has no such shape. Figure 3 is the Y lying on its side. Figure 4 has an extra level line under the stem, which X does not have there. So the answer is (a) Figure 1.
Question 11
Select the option figure which is embedded in the given figure (rotation is NOT allowed).
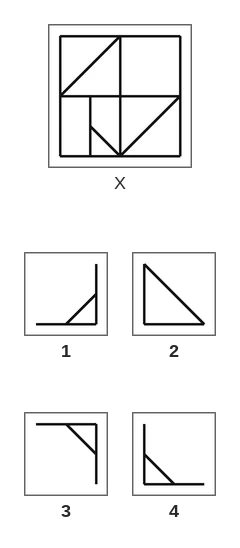
(a) Figure 1 (b) Figure 2 (c) Figure 3 (d) Figure 4
Answer. Check each small figure in X. Figure 4 is an L with a short slant from the middle of its upright down to its foot. In X it sits at the bottom: an upright line drops from the middle level line to the bottom side, the bottom side is the foot of the L, and a short slant joins the middle of the upright to the bottom side. Figure 1 is the same shape mirrored, with its foot pointing left, and Figure 3 is it turned upside down. Figure 2 has a long slant from the top of the upright, which makes a closed triangle, and X has no such triangle. So the answer is (d) Figure 4.
Question 12
Select the option figure which is embedded in the given figure (rotation is NOT allowed).
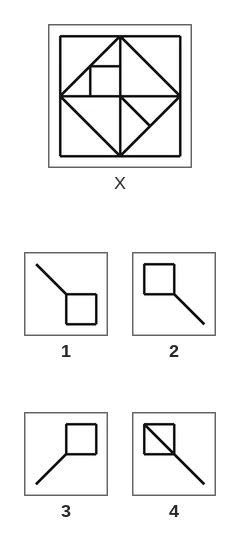
(a) Figure 1 (b) Figure 2 (c) Figure 3 (d) Figure 4
Answer. Check each small figure in X. Figure 2 is a small square with a tail going down to the right from its bottom-right corner. In X, the two middle lines and two short lines make a small square just above and to the left of the centre, and a short slant runs from the centre down to the right. Figure 3 has the tail at the bottom-left corner, which is the shape mirrored. Figure 1 has the square at the bottom-right with the tail going up, which is the shape turned upside down. Figure 4 draws a slanting line through the small square as well, and X has no line inside that square. So the answer is (b) Figure 2.
Figure Completion: Symmetries of a Square Pattern
In a figure completion question a square pattern has one quarter missing, shown by a question mark. You pick the quarter that completes it. The question reads: "Select the figure from the options that can replace the question mark (?) and complete the given pattern."
These patterns are built with symmetry. There are four kinds to know.
| Symmetry | What it means | How the quarters copy each other |
|---|---|---|
| mirror left-right | the left half is the right half flipped | each quarter is its side neighbour flipped left-right |
| mirror top-bottom | the top half is the bottom half flipped | each quarter is the one above or below it flipped top-bottom |
| half turn | the pattern looks the same after a half turn | each quarter is the opposite quarter turned halfway round |
| quarter turn | the pattern looks the same after turning it a quarter turn | each quarter is the next one turned a quarter turn |
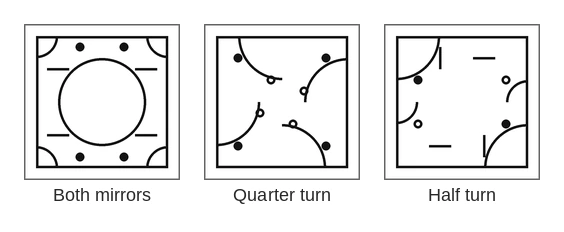
The first pattern in the picture has both mirrors, and so it also has a half turn. The second has only quarter-turn symmetry: it looks the same after a quarter turn, but no quarter is a mirror image of its neighbour. The third has only half-turn symmetry: opposite quarters match when turned halfway round, but side neighbours do not match at all.
Flipping is not turning
A quarter flipped left-right and the same quarter turned halfway round are different pictures. Arcs and slanting lines show the difference best: an arc in the top-left corner goes to the top-right corner when flipped left-right, but to the bottom-right corner when turned halfway round. Keep the two apart and most wrong options fall away.
Solved Questions: Completing a Pattern
Question 13
Select the figure from the options that can replace the question mark (?) and complete the given pattern.
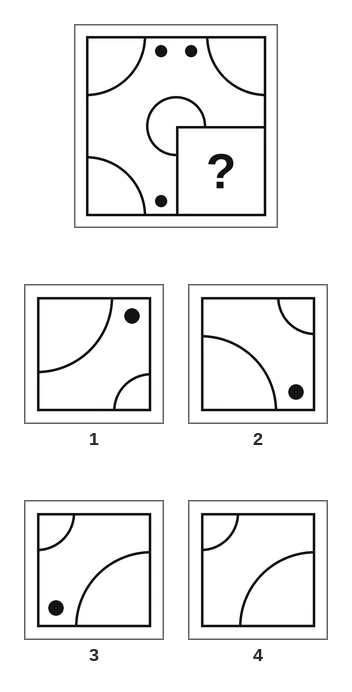
(a) Figure 1 (b) Figure 2 (c) Figure 3 (d) Figure 4
Answer. First find the symmetry. The top-left and top-right quarters are mirror images of each other, left and right. The top-left and bottom-left quarters are mirror images top and bottom. So the whole pattern has both mirrors. Then the missing bottom-right quarter is the bottom-left quarter flipped left-right. That puts the big arc in its bottom-right corner, the small arc in its top-left corner, where it finishes the circle in the middle, and the dot near the bottom edge, close to the upright centre line. Figure 3 shows this. Figure 1 is the top-left quarter copied without flipping, and Figure 2 is the bottom-left quarter copied without flipping. Figure 4 has lost its dot. So the answer is (c) Figure 3.
Question 14
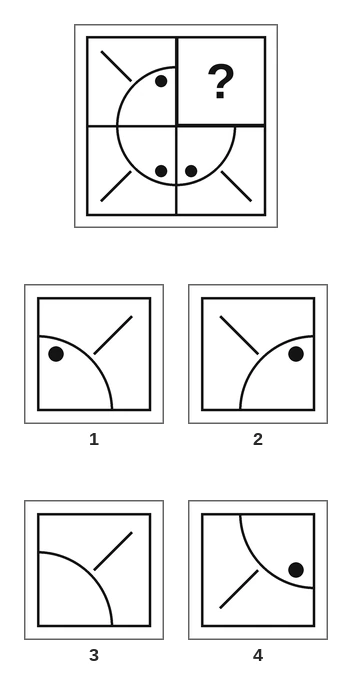
Select the figure from the options that can replace the question mark (?) and complete the given pattern.
(a) Figure 1 (b) Figure 2 (c) Figure 3 (d) Figure 4
Answer. The two lines through the middle split the pattern into four quarters. The bottom-left and bottom-right quarters are mirror images left and right, and the top-left and bottom-left quarters are mirror images top and bottom. So the pattern has both mirrors, and the missing top-right quarter is the top-left quarter flipped left-right. Its short slanting spoke points to the top-right corner, its arc curves round the centre at its bottom-left, and its dot sits inside the arc, close to the upright centre line. Figure 1 matches. Figure 2 is the top-left quarter copied as it is, so its spoke points the wrong way. Figure 4 is the bottom-left quarter copied, and Figure 3 has no dot. So the answer is (a) Figure 1.
Question 15
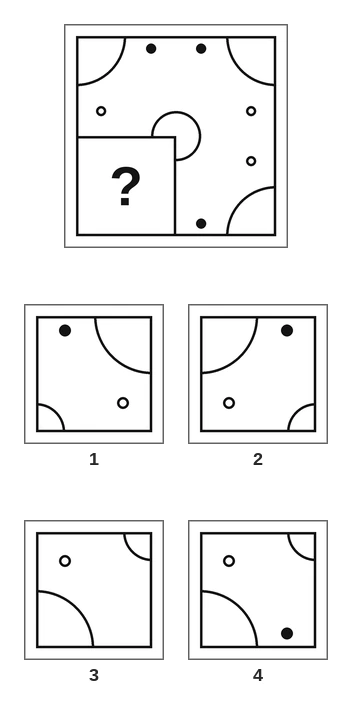
Select the figure from the options that can replace the question mark (?) and complete the given pattern.
(a) Figure 1 (b) Figure 2 (c) Figure 3 (d) Figure 4
Answer. The top two quarters are mirror images left and right, and the right two are mirror images top and bottom, so the pattern has both mirrors. The missing bottom-left quarter is the top-left quarter flipped top-bottom. The big arc goes to the bottom-left corner, the small arc to the top-right corner, where it finishes the circle round the centre, the ring moves near the top and the dot near the bottom edge. Figure 4 has all of this. Figure 2 is the top-left quarter copied without flipping, Figure 1 is the top-right quarter copied, and Figure 3 has lost the dot. So the answer is (d) Figure 4.
Reading the Three Quarters, and the Traps
You see three quarters, and those three tell you which symmetry the pattern has. Work in this order.
Step 1: test the mirrors
Look at the two quarters that share a side with each other (for example, the two top ones when the bottom-right is missing). Are they mirror images? Then look at another pair that shares a side. If both pairs are mirror images, the pattern has both mirrors.
Step 2: if the mirrors fail, test the turns
Turn one quarter a quarter turn round the centre of the whole pattern and see whether you get the next quarter. If you do, the pattern has quarter-turn symmetry. If not, check whether opposite quarters match when turned halfway round: that is half-turn symmetry.
Step 3: build the missing quarter
- Both mirrors: flip the side neighbour of the missing quarter.
- Quarter turn: turn the quarter before it one more quarter turn.
- Half turn: turn the opposite quarter halfway round.
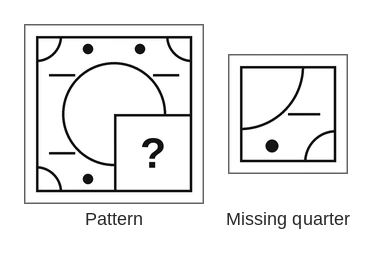
In the picture the top two quarters are mirror images and the left two are mirror images, so the pattern has both mirrors. The missing bottom-right quarter is the bottom-left quarter flipped left-right: the little corner arc moves to the bottom-right corner, and the curve near the centre finishes the circle round the middle.
The usual wrong options
- A neighbouring quarter copied as it is, without flipping. Watch for this one first.
- The right quarter flipped the wrong way, or turned the wrong way.
- The right quarter with one mark or line missing, or one extra.
A quick check: arcs that touch the centre lines must join up with the arcs across those lines. In the picture, the curve in the missing quarter has to finish the circle.
Time check: a figure completion question should take 20–30 seconds.
Solved Questions: Turns and Mirrors
Question 16
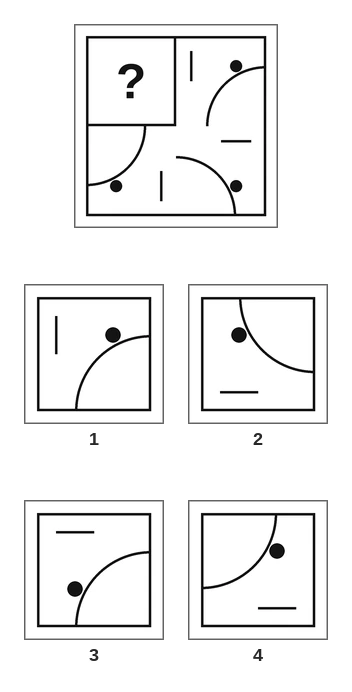
Select the figure from the options that can replace the question mark (?) and complete the given pattern.
(a) Figure 1 (b) Figure 2 (c) Figure 3 (d) Figure 4
Answer. Test the mirrors first. The top-right and bottom-right quarters are not mirror images of each other, and the two bottom quarters are not mirror images either. So try turning. Turn the top-right quarter a quarter turn clockwise round the centre of the pattern and you get the bottom-right quarter, and the same turn takes the bottom-right quarter to the bottom-left. So the pattern has quarter-turn symmetry, and the missing top-left quarter is the bottom-left quarter turned one more quarter turn. Its big arc runs from the top side round to the upright centre line, its dot sits near the top-left corner, and its short level line lies near the bottom-left. Figure 2 shows this. Figure 4 is the right quarter flipped left-right, which is what a mirror would give, and Figure 1 is it turned too far. So the answer is (b) Figure 2.
Question 17
Select the figure from the options that can replace the question mark (?) and complete the given pattern.
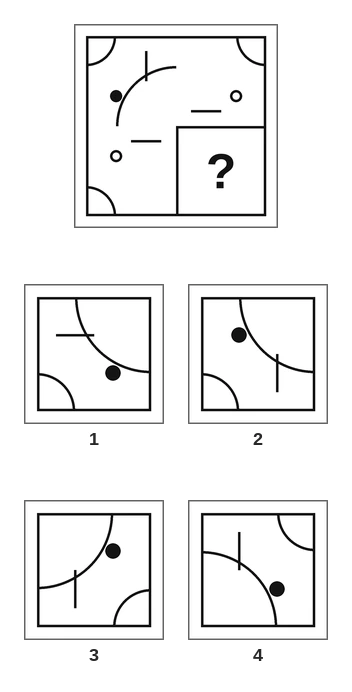
(a) Figure 1 (b) Figure 2 (c) Figure 3 (d) Figure 4
Answer. The top-left quarter has a big arc, a small corner arc, a short upright line and a dot. The top-right quarter has a ring, a short level line and a small corner arc, so the two are not mirror images, and neither are the two left quarters. A quarter turn does not work either. Now try a half turn: turn the top-right quarter halfway round the centre and you get exactly the bottom-left quarter. So the pattern has half-turn symmetry, and the missing bottom-right quarter is the top-left quarter turned halfway round. The small corner arc goes to the bottom-right corner, the big arc curves round the centre from the top-left of the quarter, the short upright line moves to the lower left, and the dot to the upper right. Figure 3 has this. Figure 2 is the top-left quarter only flipped top-bottom, and Figure 4 is it only flipped left-right. A half turn needs both flips at once. So the answer is (c) Figure 3.
Question 18
Select the figure from the options that can replace the question mark (?) and complete the given pattern.
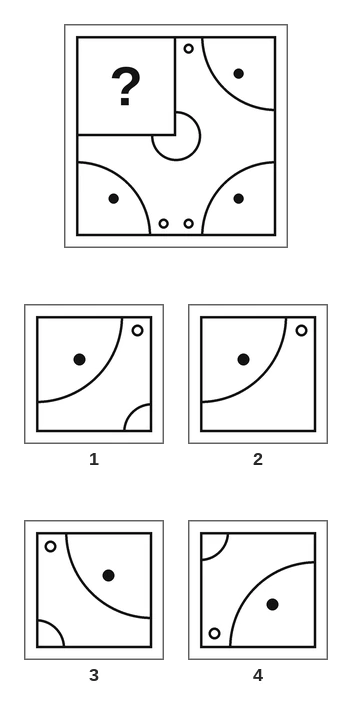
(a) Figure 1 (b) Figure 2 (c) Figure 3 (d) Figure 4
Answer. The missing quarter is the top-left one. The top-right and bottom-right quarters are mirror images top and bottom, and the bottom two quarters are mirror images left and right, so the pattern has both mirrors. The top-left quarter is then the top-right quarter flipped left-right: the big arc in its top-left corner, the small arc in its bottom-right corner next to the centre, the dot inside the big arc and the ring near the top edge, close to the upright centre line. Figure 1 shows this. Figure 4 is the bottom-right quarter copied, Figure 3 is the top-right quarter copied without flipping, and Figure 2 is missing the small arc. So the answer is (a) Figure 1.