
How to Use These Solved Questions
There are 32 solved questions here, mixed across all the types of this chapter: seven folding questions, one transparent sheet, seven embedded figures (two of them the reverse kind), three completion patterns, five triangle counts, two counts of squares or rectangles, four dice, two nets and one painted cuboid. Most are a step harder than the ones in the earlier sections. The folds use narrow strips and corners folded to the centre, so some holes go through three or four layers. One dice question asks about a face that is not shown at all, and one uses symbols.
Use the same habits as before. Count the layers before you open the folds, then open them last fold first. Find X's odd corner before you trace it. Let the full row and column of a pattern tell you the symmetry. Count triangles in groups and write the subtotals. List the faces seen next to the asked face on a dice. Skip one square along a row of a net.
Try each question yourself before you read its answer. When you get one wrong, find the step you skipped, not just the option you chose. The wrong options are built from exactly those slips: a twin that was not flipped, X turned instead of moved, a group of triangles missed, a face that was seen next to the asked face.
Keep the targets from the last section in mind: 30–45 seconds for folding, 30–40 for an embedded figure, 20–30 for completion, 45–60 for counting triangles, 30–45 for dice and 20–30 for the opposite face on a net. Several of these will take longer the first time. Mark them, and try them again after a few days without looking at the answers.
Solved Questions
Question 1
A paper is folded and cut as shown below. How will it appear when unfolded?
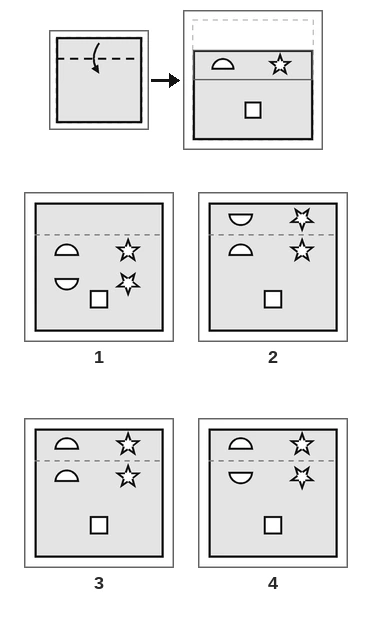
(a) Figure 1 (b) Figure 2 (c) Figure 3 (d) Figure 4
Answer. Only one fold here: a narrow strip at the top is folded down. Count the layers first. The semicircle and the star are punched where the strip lies, so each gets one twin. The square is lower down, where there is one layer, so it stays alone. That makes five holes, and every option has five, so the count does not settle this one. Open the strip. Each twin goes straight up across the dotted crease, as far above it as the hole is below. The crease is level, so each twin is flipped top to bottom. The semicircle's round side points up, so its twin's round side points down. The star points up, so its twin points down. Figure 1 puts the twins below the holes, on the wrong side of the crease. Figure 3 copies both shapes without flipping them. Figure 4 has every shape in the right place but each pair the wrong way round: the twins point up and the holes below them point down. So the answer is (b) Figure 2.
Question 2
A square sheet of paper is folded along the dotted lines in the order shown, and then holes are punched in it as shown. How will the paper look when it is unfolded?
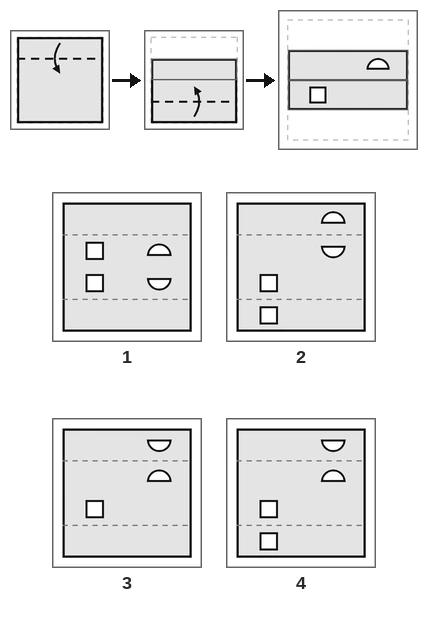
(a) Figure 1 (b) Figure 2 (c) Figure 3 (d) Figure 4
Answer. Two strips are folded in, one from the top and one from the bottom. They meet at the middle line without overlapping, so every part of the folded paper has two layers and each hole makes two. The semicircle is in the top half, under the top strip, so its twin goes up across the top crease and is flipped top to bottom: its round side points down. The square is in the bottom half, so its twin goes down across the bottom crease. A square looks the same after any flip. Figure 1 puts the twins across the middle line, where there was no fold at all. Figure 3 forgets the square's twin. Figure 2 has the semicircles in the right places but the wrong way round. So the answer is (d) Figure 4.
Question 3
A transparent sheet with a pattern is given below. Select the option that depicts the pattern that would appear when the given transparent sheet is folded at the dotted line as shown.
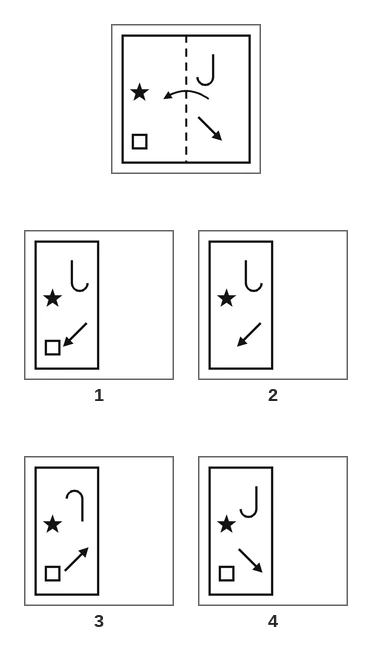
(a) Figure 1 (b) Figure 2 (c) Figure 3 (d) Figure 4
Answer. The left half stays, so the black star and the small square do not move. The right half comes over onto the left, so the hook and the arrow move to their mirror places across the upright line and are flipped left to right. The hook is shaped like a J, with its curl at the bottom turning left. After the fold the curl turns right. The arrow points down and to the right, and after the fold it points down and to the left. Both stay at the same height. Figure 4 moves the marks across but keeps their old directions. Figure 3 turns them upside down instead: the hook's curl is at the top and the arrow points up. Figure 2 has lost the square. So the answer is (a) Figure 1.
Question 4
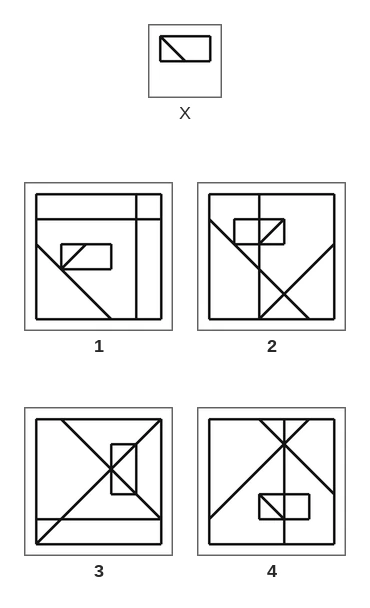
Select the option figure in which the given figure (X) is embedded as its part (rotation is NOT allowed).
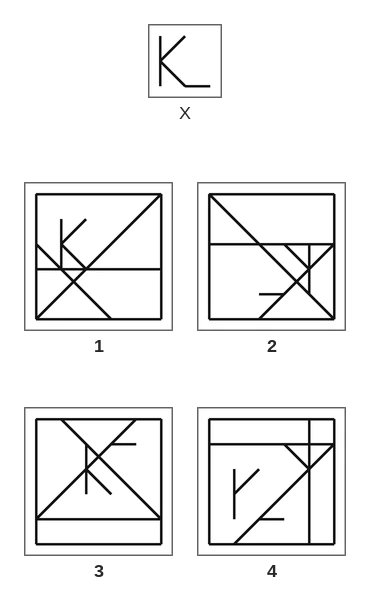
(a) Figure 1 (b) Figure 2 (c) Figure 3 (d) Figure 4
Answer. X looks like a K with a short foot: an upright line, two slanting arms leaving it from one point, and a level foot going right from the end of the lower arm. That point where both arms leave the upright line is the odd corner, so look for it first. In Figure 1 the K sits near the top left. Its foot lies along the long level line, which is fine, because lines of the option may run on past the ends of X. Figure 2 is a mirror image, with the arms pointing left. Figure 3 has the foot at the top. Figure 4 has the upright line, the upper arm and a foot, but no lower arm. So the answer is (a) Figure 1.
Question 5
Select the option figure in which the given figure (X) is embedded as its part (rotation is NOT allowed).
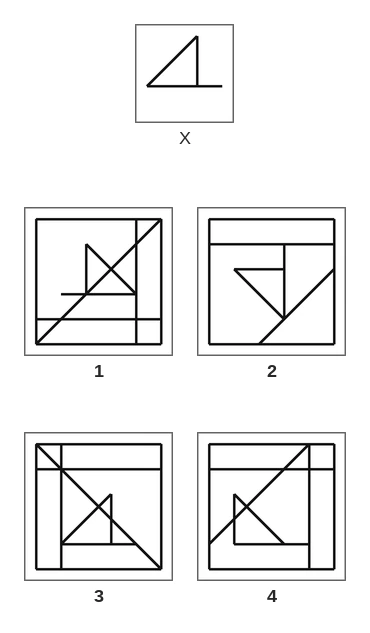
(a) Figure 1 (b) Figure 2 (c) Figure 3 (d) Figure 4
Answer. X is a right triangle with the right angle at its bottom-right corner, and its bottom side runs on past that corner to the right. Its slanting side rises from the bottom-left corner to the top of the upright side. The tail is the easy thing to spot. In Figure 3 the triangle sits low in the figure, with its bottom side running on to the right along the bottom part of the drawing. Figure 1 is a mirror image, with the tail on the left. In Figure 4 the upright side stands at the left end, so the slant runs the other way. Figure 2 is X turned. So the answer is (c) Figure 3.
Question 6
Select the option figure which is embedded in the given figure (rotation is NOT allowed).
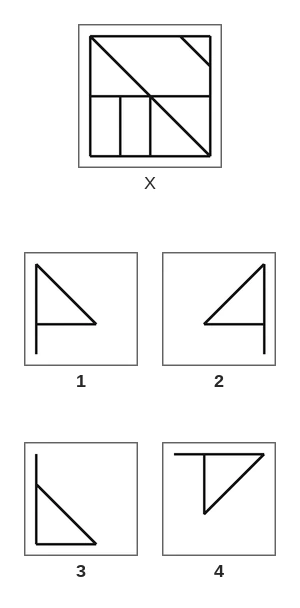
(a) Figure 1 (b) Figure 2 (c) Figure 3 (d) Figure 4
Answer. This is the reverse question: the big figure is X and the options are small, so look for each option inside X, the same way up and the same size. Start with the slanting lines. Every slanting line in X runs down to the right. Figure 2 needs a line slanting down to the left, so it cannot be in X. Figure 4 is turned, and it needs a line slanting down to the left too. That leaves two. Figure 1 is a right triangle with its slant running down to the right and its upright side running on below the right angle. In X, the left side of the frame, the long diagonal from the top-left corner and the level middle line make that triangle, and the left side of the frame carries on below the middle line. Figure 3 has its upright side running on above the triangle, but in X the triangle's top corner is the corner of the frame, with nothing above it. So the answer is (a) Figure 1.
Question 7
How many triangles are there in the given figure?
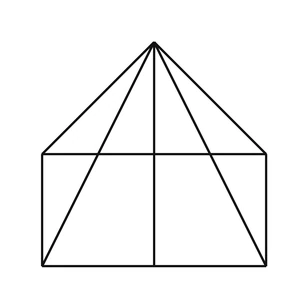
(a) 15 (b) 17 (c) 19 (d) 13
Answer. Five lines start from the top of the roof: the two roof lines, the two long lines down to the bottom corners, and the upright middle line. So use the lines-from-one-point method. The level line along the top of the walls crosses all five, which gives 5 × 4 ÷ 2 = 10 triangles. The floor crosses only the middle three, which gives 3 × 2 ÷ 2 = 3. The left wall meets two of them, the roof line at its top and the long line at its bottom, which gives 1, and the right wall gives 1 more. That is 15 triangles with a corner at the top of the roof. Now look for triangles away from that point: there is one small triangle in each top corner of the walls, between the wall, the level line and a long line. That makes 2. Total 15 + 2 = 17. Option (a) forgets those two corner triangles. So the answer is (b) 17.
Question 8
How many triangles are there in the given figure?
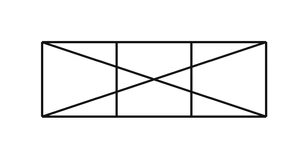
(a) 16 (b) 12 (c) 18 (d) 14
Answer. Start from the ready count. A rectangle with both diagonals has 8 triangles: 4 meeting at the centre and 4 halves. The two upright lines spoil none of them, so look only for triangles that use an upright line. Take the left one. It makes a small triangle in the top-left corner with the top side and a diagonal, another in the bottom-left corner, and a thin one just left of the centre, between the two diagonals. It also makes two long ones that reach the far end of the rectangle, one along the top side and one along the bottom side. That is 5. The right upright line makes 5 more in the same way. Total 8 + 5 + 5 = 18. Option (a) is what you get if you miss the two thin triangles beside the centre. So the answer is (c) 18.
Question 9
How many squares are there in the given figure?
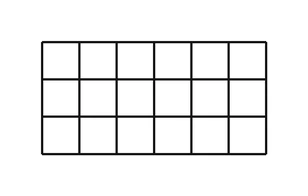
(a) 36 (b) 32 (c) 18 (d) 28
Answer. Use the squares formula for a grid of 3 rows and 6 columns. Small squares: 3 × 6 = 18. Squares of side 2: each side loses one, so 2 × 5 = 10. Squares of side 3: 1 × 4 = 4. A square of side 4 does not fit in 3 rows. Total 18 + 10 + 4 = 32. Option (c) counts only the small squares, and option (d) misses the four biggest ones. So the answer is (b) 32.
Question 10
Three different positions of the same dice are shown. Find the letter on the face opposite the face showing 'F'.
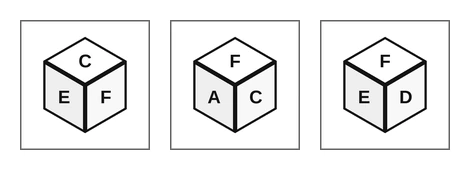
(a) E (b) B (c) A (d) C
Answer. F is in all three positions, so list its neighbours. In the first position it is with C and E. In the second, with A and C. In the third, with E and D. So F is seen next to C, E, A and D: four different faces. The only face never seen with F is B, so B is opposite F. E, A and C each touch F somewhere, so none of them can be opposite it. So the answer is (b) B.
Question 11
Two different positions of the same dice are shown. Which letter is on the face opposite the face showing 'D'?
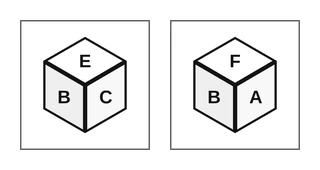
(a) A (b) F (c) E (d) B
Answer. D is not shown in either position, so we cannot list its neighbours. Find the other pairs instead. The two positions share only B. Read each one clockwise from B, going top, right, left round the corner. In the first position B is on the left, so the order is B, E, C. In the second, B is on the left again: B, F, A. Faces in matching places are opposite, so E is opposite F and C is opposite A. That uses up A, C, E and F, so the last two faces, B and D, must be opposite each other. So the answer is (d) B.
Question 12
A cube is made by folding the given sheet. In the cube so formed, which letter will be on the face opposite to the face showing 'B'?
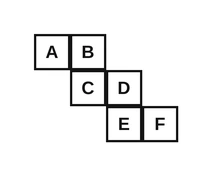
(a) E (b) C (c) F (d) A
Answer. There is no row of three squares here, so the skip-one rule cannot be used. Use the zigzag rule instead: in four squares that make a Z or an S shape, the two end squares are opposite. B, C, D and E make such a zigzag: B sits above C, D is beside C, and E sits below D. So B and E are opposite. You can check the others the same way: A, B, C, D give A opposite D, and C, D, E, F give C opposite F. A and C both touch B in the net, so neither can be opposite it. So the answer is (a) E.
Question 13
A square sheet of paper is folded along the dotted lines in the order shown, and then holes are punched in it as shown. How will the paper look when it is unfolded?
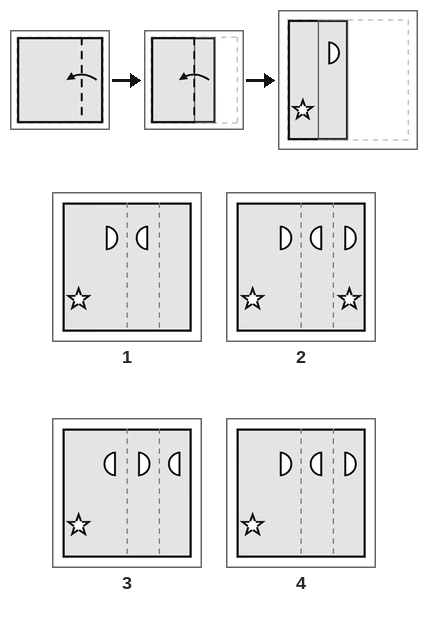
(a) Figure 1 (b) Figure 2 (c) Figure 3 (d) Figure 4
Answer. Watch the layers here. The first fold lays the right strip over its neighbour, so that quarter of the sheet is doubled. The second fold brings the whole right half, doubled quarter and all, over onto the left half. Where the semicircle is punched there are now three layers: the sheet, the right half folded over, and the strip on top of that. So it makes three semicircles. The star is near the left edge, where nothing was folded over, so it stays single. Open the last fold first: the semicircle gets a twin across the middle crease, flipped, so it faces left. Then open the strip: that twin gets its own twin across the strip crease, flipped again, so it faces right. From left to right the three face right, left, right. Figure 1 stops at two semicircles, Figure 3 has every one the wrong way round, and Figure 2 gives the star a twin it cannot have. So the answer is (d) Figure 4.
Question 14
A paper is folded and cut as shown below. How will it appear when unfolded?
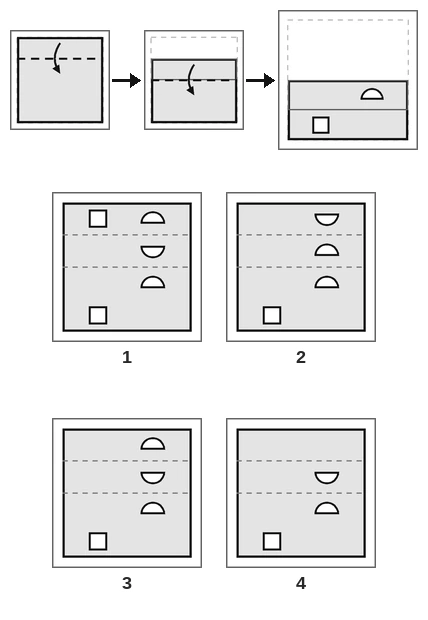
(a) Figure 1 (b) Figure 2 (c) Figure 3 (d) Figure 4
Answer. Count the layers under each hole. The top strip is folded down first, so the band just below it is doubled. Then the whole top half, with that doubled band, comes down over the bottom half. Where the semicircle is punched there are now three layers, and near the bottom edge, where the square is, there is just one. So the opened sheet has three semicircles and one square. Figure 1 gives the square a twin and Figure 4 has only two semicircles, so both are out. Open the middle fold first: the semicircle gets a twin above the middle crease, flipped, so its round side points down. Then open the strip: that twin gets a twin of its own above the strip crease, flipped back, so its round side points up. From the top, the three read up, down, up. Figure 2 has the top two the wrong way round. So the answer is (c) Figure 3.
Question 15
Select the figure from the options that can replace the question mark (?) and complete the given pattern.
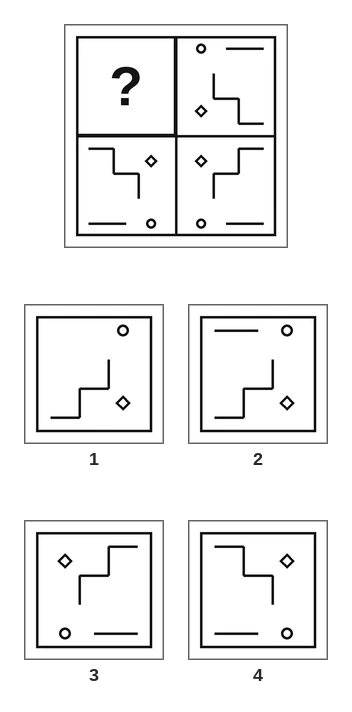
(a) Figure 1 (b) Figure 2 (c) Figure 3 (d) Figure 4
Answer. The top-left quarter is missing. The bottom row is complete, and its two quarters are mirror images left to right. The right column is complete, and its two quarters are mirror images top to bottom. So the pattern has both mirrors, and the top-left quarter is the top-right quarter seen in an upright mirror. In the top-right quarter the staircase climbs from the bottom-right up towards the left, the level bar is at the top on the right, the ring is at the top-left and the diamond at the bottom-left. Mirrored, the staircase climbs from the bottom-left up to the right, the bar is at the top-left, the ring at the top-right and the diamond at the bottom-right. Figure 4 is flipped top to bottom instead, Figure 3 is the bottom-right quarter copied, and Figure 1 has lost the level bar. So the answer is (b) Figure 2.
Question 16
Select the option figure in which the given figure (X) is embedded as its part (rotation is NOT allowed).
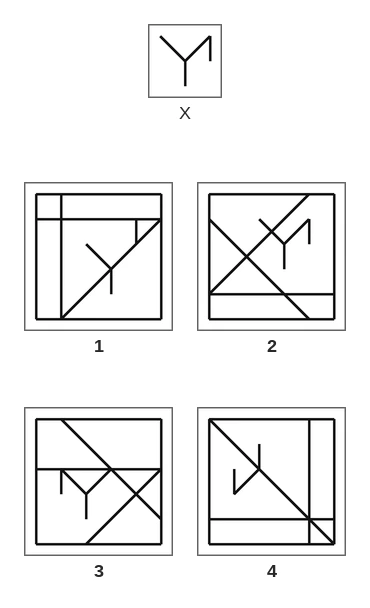
(a) Figure 1 (b) Figure 2 (c) Figure 3 (d) Figure 4
Answer. X is a V with a short upright stem under its point and a short hook hanging down from the top of its right arm. The hook is the odd part: it makes a narrow corner with the right arm. Look for it in each option. In Figure 2 the V sits near the top right, with its hook hanging from the top of its right arm and its stem dropping from its point. Figure 1 has a hook that goes up from the arm instead of down. Figure 3 has the hook on the left arm, so it is a mirror image. Figure 4 has the V upside down. So the answer is (b) Figure 2.
Question 17
Select the option figure in which the given figure (X) is embedded as its part (rotation is NOT allowed).
(a) Figure 1 (b) Figure 2 (c) Figure 3 (d) Figure 4
Answer. X is a flat rectangle, twice as long as it is high, with a short slanting line from its top-left corner down to the middle of its bottom side. That short slant is the thing to find. In Figure 4 the rectangle sits near the bottom, right of the middle, and the slant runs down to the right from its top-left corner, crossing nothing else. Figure 2 has the slant starting from the top-right corner. Figure 1 has a slant inside the rectangle too, but it runs up to the right, from the bottom-left corner. Figure 3 has the rectangle standing upright. So the answer is (d) Figure 4.
Question 18
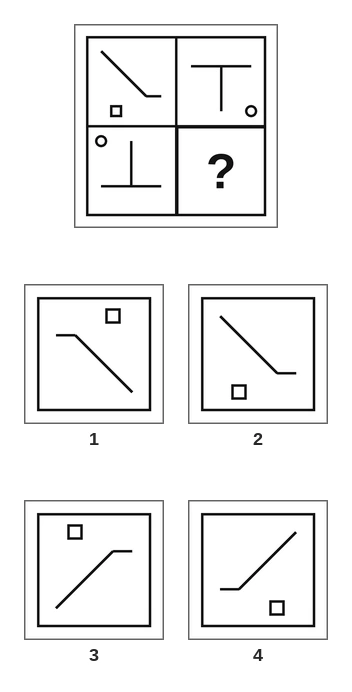
Select the figure from the options that can replace the question mark (?) and complete the given pattern.
(a) Figure 1 (b) Figure 2 (c) Figure 3 (d) Figure 4
Answer. Check the mirrors first. The top-left quarter has a slanting line and a small square, while the quarters beside it, the top-right and the bottom-left, each hold a T and a ring, so neither mirror works. Now compare the two quarters with a T. In the top-right one the T stands upright with its ring at the bottom-right, and in the bottom-left one the T is turned halfway round with its ring at the top-left. Turning the top-right quarter halfway round gives exactly the bottom-left one, so the pattern repeats after a half turn, and the missing bottom-right quarter is the top-left quarter turned halfway round. Its slanting line still slants the same way, but the short level end moves to the upper-left end of the slant, and the small square moves from the bottom-left of the quarter to the top-right. Figure 2 is the top-left quarter copied as it is, while Figures 3 and 4 are mirror images of it. So the answer is (a) Figure 1.
Question 19
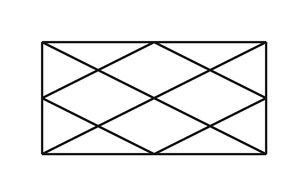
How many triangles are there in the given figure?
(a) 20 (b) 16 (c) 24 (d) 18
Answer. Start from a ready count and add. Without the rhombus, a rectangle with both diagonals has 8 triangles: 4 meeting at the centre and 4 halves. The rhombus joins the middles of the four sides, so it cuts off a triangle at each corner of the rectangle: 4 more. A diagonal runs from each corner of the rectangle through its corner triangle and splits it into two small ones: 8 more. Inside the rhombus nothing new appears, because no line joins the points where the diagonals cross its sides. Total 8 + 4 + 8 = 20. Option (b) is what you get if you forget the 4 corner triangles. So the answer is (a) 20.
Question 20
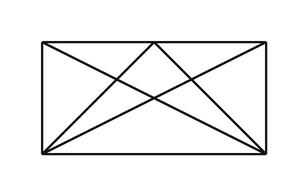
How many triangles are there in the given figure?
(a) 21 (b) 19 (c) 25 (d) 23
Answer. Count in stages. The rectangle with its two diagonals has the ready count of 8. Next take the line from the bottom-left corner up to the middle of the top side, and look only for triangles that use it. Four of them have a corner where it crosses the diagonal from the top-left corner: a small one between the two diagonals, one against the top side, one against the left side and a long one along the bottom side. Two more do not: the triangle it cuts off in the top-left corner, and the one it makes with the right half of the top side and the diagonal from the top-right corner. That is 6. The line from the bottom-right corner makes 6 more in the same way on the right. Last come the triangles that use both new lines: the big one standing on the bottom side with its top at the middle of the top side, and two narrower ones, each made by the two new lines and one diagonal. That is 3. Total 8 + 6 + 6 + 3 = 23. Option (a) misses the two narrow ones. So the answer is (d) 23.
Question 21
How many rectangles are there in the given figure? (Squares also count as rectangles.)
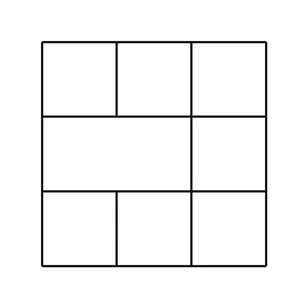
(a) 20 (b) 28 (c) 36 (d) 24
Answer. Use the formula for the full grid first, then take away what the gap spoils. A full grid of 3 rows and 3 columns has 4 level lines and 4 upright lines, so it has 6 × 6 = 36 rectangles. Here one piece of the left inner upright line is missing, in the middle row. Any rectangle with a side along that missing piece cannot be drawn. Such a rectangle has the left inner line as one of its sides: as its left side, with either of the two lines to its right, or as its right side, with the outer left line, so 3 choices. Its top must be above the middle row and its bottom below it, which can be done in 2 × 2 = 4 ways. So 3 × 4 = 12 rectangles are lost, and 36 − 12 = 24. Option (c) is the full grid, which forgets the gap. So the answer is (d) 24.
Question 22
Two different positions of the same dice are shown. Which letter is on the face opposite the face showing 'E'?
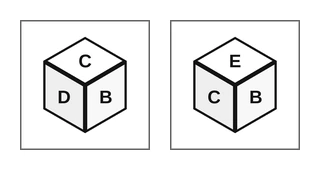
(a) F (b) B (c) D (d) A
Answer. Here the two positions share two faces, C and B. When that happens, the third faces are opposite. C and B meet along one edge of the dice, and the two faces at the two ends of that edge are the third faces: D in the first position and E in the second. Two faces at opposite ends of one edge are opposite faces, so D is opposite E. B was seen next to E, so it is out at once. So the answer is (c) D.
Question 23
Three different positions of the same dice are shown. Which letter is on the face opposite the face showing the heart?
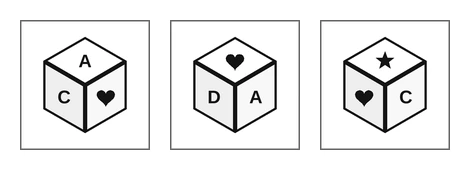
(a) B (b) C (c) A (d) D
Answer. List the faces seen next to the heart. In the first position it is with A and C. In the second, with D and A. In the third, with the star and C. So the heart touches A, C, D and the star: four different faces. The sixth face, B, must be opposite the heart. C, A and D were all seen next to the heart, so none of them can be the answer. So the answer is (a) B.
Question 24
Select the cube that can be formed by folding the given sheet along the lines.
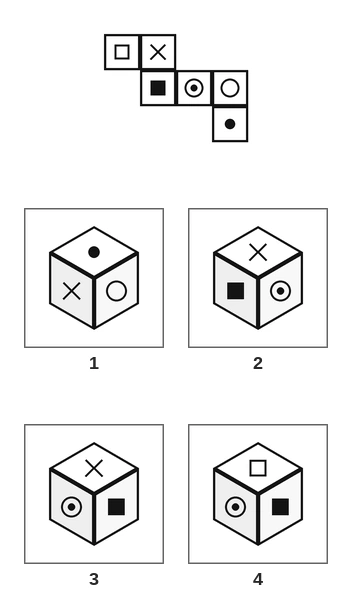
(a) Figure 1 (b) Figure 2 (c) Figure 3 (d) Figure 4
Answer. First the opposite pairs. In the row black square, ring with a dot, empty ring, skip one: the black square is opposite the empty ring. The white square, cross, black square and ring with a dot make a zigzag, so its end squares, the white square and the ring with a dot, are opposite. The cross and the black dot are left, so they are the third pair. Figure 1 shows the cross with the black dot, and Figure 4 shows the white square with the ring with a dot, so both are out. Now the order. In the net the cross, the ring with a dot and the black square meet at one point, the bottom-right corner of the cross. Clockwise round that point they go cross, ring with a dot, black square. On the cube, clockwise round the corner is top, right, left, so with the cross on top the ring with a dot must be on the right and the black square on the left. Figure 2 shows that. Figure 3 has the same three faces in the other order, which is a mirror image. So the answer is (b) Figure 2.
Question 25
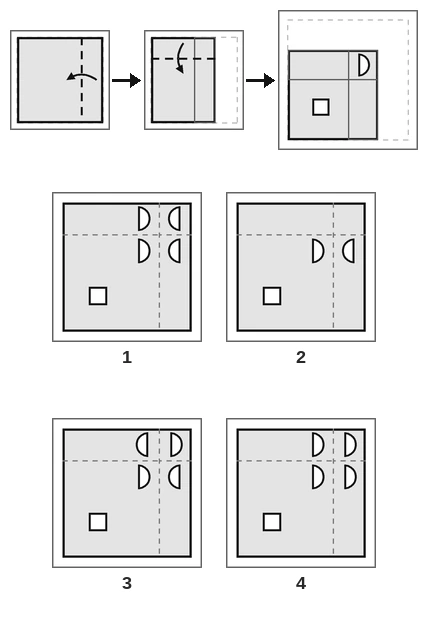
A square sheet of paper is folded along the dotted lines in the order shown, and then holes are punched in it as shown. How will the paper look when it is unfolded?
(a) Figure 1 (b) Figure 2 (c) Figure 3 (d) Figure 4
Answer. Two narrow strips are folded in, one from the right and one from the top. They overlap only in the top-right corner of the folded paper, so a hole punched there goes through four layers. The semicircle is punched in exactly that corner, so it gives four semicircles. The square is in the open part with one layer, so it stays single. Open the top strip first: the semicircle gets a twin above the level crease. A level crease flips top to bottom only, so a round side facing right still faces right. Then open the right strip: both semicircles get twins across the upright crease, and these do flip, so they face left. In the top-right corner of the sheet the semicircles read right, left on both rows. Figure 2 has only two semicircles, Figure 4 has all four facing right, and Figure 3 has the top pair the wrong way. So the answer is (a) Figure 1.
Question 26
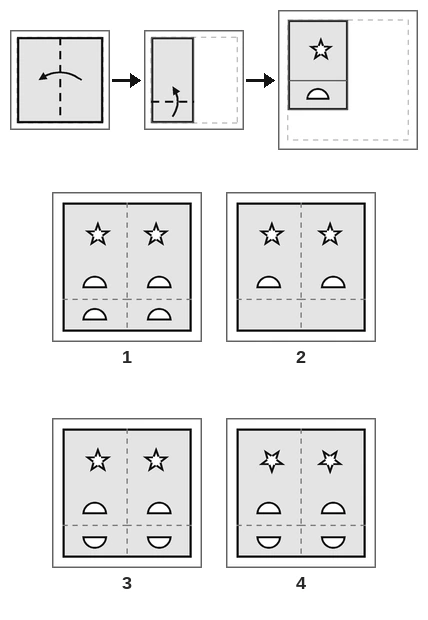
A paper is folded and cut as shown below. How will it appear when unfolded?
(a) Figure 1 (b) Figure 2 (c) Figure 3 (d) Figure 4
Answer. The semicircle is punched where the bottom strip lies, and the paper there was already doubled by the first fold, so it goes through four layers. The star is higher up, over two layers. So the opened sheet needs four semicircles and two stars, and Figure 2, with only two semicircles, is out. Open the strip first: each semicircle gets a twin below the level crease, flipped top to bottom, so its round side points down. Then open the middle fold: the left half is copied onto the right, flipped left to right. That flip does not change a star pointing up or a semicircle pointing up or down. Figure 1 forgets to flip the bottom row, and Figure 4 turns both stars upside down, as if they had crossed a level crease. So the answer is (c) Figure 3.
Question 27
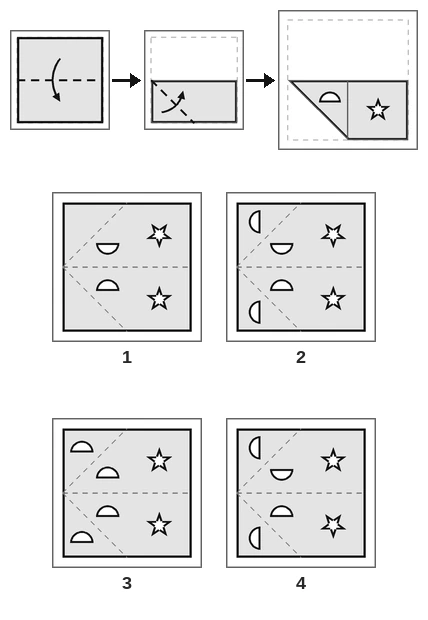
A square sheet of paper is folded along the dotted lines in the order shown, and then holes are punched in it as shown. How will the paper look when it is unfolded?
(a) Figure 1 (b) Figure 2 (c) Figure 3 (d) Figure 4
Answer. After the first fold the paper is the bottom half, two layers thick. Then the bottom-left corner is folded up to the centre along a slanting line. The semicircle is punched on that folded corner, so it goes through four layers. The star is on the right, over two layers. Open the corner fold first. The twin lands in the bottom-left corner of the sheet, and a slanting crease changes the way a shape faces: a round side pointing up comes out pointing left. Then open the first fold: the top half is the bottom half flipped top to bottom. So in the top half the inner semicircle points down, the corner one still points left, and the star points down. Figure 1 misses the corner holes, Figure 3 never changes the semicircles, and Figure 4 has the two stars the wrong way round. So the answer is (b) Figure 2.
Question 28
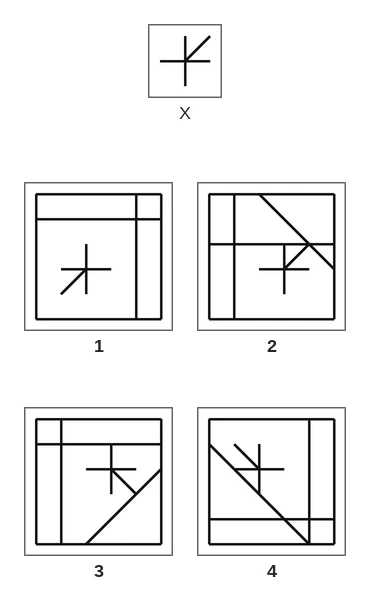
Select the option figure in which the given figure (X) is embedded as its part (rotation is NOT allowed).
(a) Figure 1 (b) Figure 2 (c) Figure 3 (d) Figure 4
Answer. X is a plus sign with one more arm, slanting from its centre up to the right. Every option has a plus sign, so the slanting arm decides it. In Figure 2 the plus sign sits a little below and to the right of the middle, and its extra arm slants up to the right from the centre. Other lines cross it and run on past it, which does not matter. Figure 4 has the arm slanting up to the left, Figure 3 down to the right, and Figure 1 down to the left. So the answer is (b) Figure 2.
Question 29
Select the option figure which is embedded in the given figure (rotation is NOT allowed).
(a) Figure 1 (b) Figure 2 (c) Figure 3 (d) Figure 4
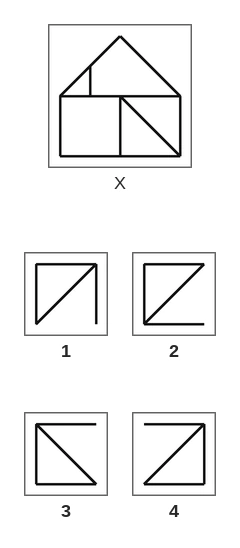
Answer. The options are small, so look for each one inside the house X, the same way up. Each option is three sides of a square with a slanting line across it, so check the slant first. Inside the rooms of X there is only one slanting line: in the bottom-right room, from its top-left corner down to its bottom-right corner. Figure 3 has a slant running that way, with the top, left and bottom sides of the square, and the bottom-right room has all of these. Figure 4 has its slant running the other way and is open on the left. Figure 2 has its slant from the bottom-left corner, and the left room has no slant at all. Figure 1 is turned, open at the bottom with its slant running the other way. The roof lines slant too, but none of them has a square round it. So the answer is (c) Figure 3.
Question 30
Select the figure from the options that can replace the question mark (?) and complete the given pattern.
(a) Figure 1 (b) Figure 2 (c) Figure 3 (d) Figure 4
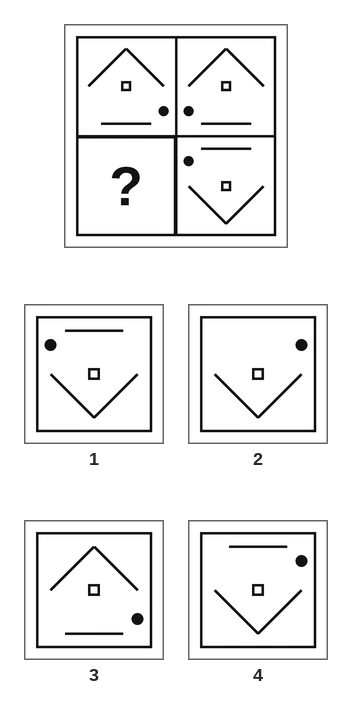
Answer. The top row is complete, and its two quarters are mirror images left to right. The right column is complete, and its two quarters are mirror images top to bottom. So the pattern has both mirrors, and the bottom-left quarter is the top-left quarter flipped top to bottom. The roof shape becomes a V, and the level bar moves from the bottom of the quarter to the top. The black dot sits on the right of the quarter in both, next to the centre of the whole pattern: low in the top-left quarter, so high in the bottom-left one. Figure 3 is the top-left quarter copied, Figure 1 has the dot on the left, and Figure 2 has lost the level bar. So the answer is (d) Figure 4.
Question 31
How many triangles are there in the given figure?
(a) 16 (b) 19 (c) 21 (d) 23
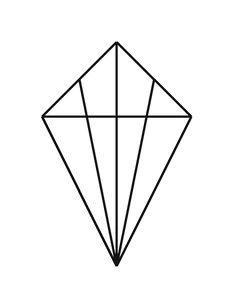
Answer. Five lines start from the bottom point of the kite: its two lower sides, the upright diagonal, and the two slanting lines that run up to the middles of the upper sides. So use the lines-from-one-point method. The level diagonal crosses all five, which gives 5 × 4 ÷ 2 = 10 triangles. The upper left side crosses three of them (the lower left side at its end, the slanting line at its middle and the upright diagonal at the top), which gives 3, and the upper right side gives 3 more. That is 16 triangles with a corner at the bottom point. Now the part above the level diagonal, away from that point: the whole top triangle, its two halves on either side of the upright diagonal, and one small triangle in each side corner, between an upper side, a slanting line and the level diagonal. That is 5. Total 16 + 5 = 21. Option (a) stops at the triangles that touch the bottom point. So the answer is (c) 21.
Question 32
A cuboid 6 cm long, 4 cm wide and 3 cm high has its top and bottom faces painted red, its front and back faces painted blue and its two end faces painted green. It is then cut into 72 cubes of side 1 cm. How many of the small cubes have exactly one red face and one blue face, and no other face painted?
(a) 8 (b) 12 (c) 16 (d) 24
Answer. A small cube with one red face and one blue face sits on an edge where a red face meets a blue face. The red faces are the top and bottom, and the blue ones are the front and back, so these are the four long edges: top-front, top-back, bottom-front and bottom-back. Each is 6 cm long, so it holds 6 small cubes. The two at its ends are corner cubes, which also touch a green end face, so they have three painted faces. That leaves 6 − 2 = 4 cubes on each edge, and 4 × 4 = 16 in all. So the answer is (c) 16.