
How Folding and Punching Works
In these questions a square sheet of paper is folded one, two or three times. Each fold is drawn as a dotted line, with a curved arrow showing which part moves. Then one or more holes are punched through the folded paper. You pick the figure that shows the sheet when it is opened out again. The question usually reads: "A paper is folded and cut as shown below. How will it appear when unfolded?"
The paper that stays never moves
When you fold, one part of the sheet stays where it is and the other part (the flap) swings over and lies on top of it. Keep your eye on the part that stays. In the figures it is drawn in the same place it had in the full sheet, and the faint dashed square shows where the rest of the sheet used to be. So the holes you see in the last figure are in their true places on the part that stayed.
One punch, one hole in every layer
A punch goes through every layer under it. If the paper is two layers thick there, the punch makes two holes. If it is four layers thick, it makes four. So a hole punched through k layers gives k holes on the opened sheet.
| Folds, each one halving the paper | Layers | Holes from one punch |
|---|---|---|
| 1 | 2 | 2 |
| 2 | 4 | 4 |
| 3 | 8 | 8 |
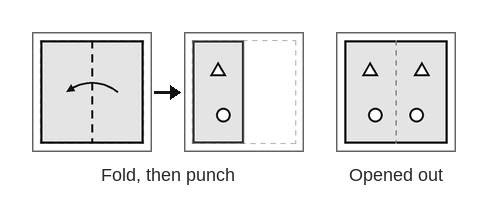
In the picture the right half was folded over onto the left half, so the left half stayed and the paper became two layers thick. A triangle pointing up and a circle were punched. Opened out, each has a twin in the right half, the same distance from the crease. The crease is drawn dashed on the opened sheet.
Keep one more thing in mind from the start: a twin is a mirror image, not a copy. You will see why that matters for triangles and hearts in a moment.
Solved Questions
Question 1
A square sheet of paper is folded along the dotted line as shown, and then holes are punched in it. How will the paper look when it is unfolded?
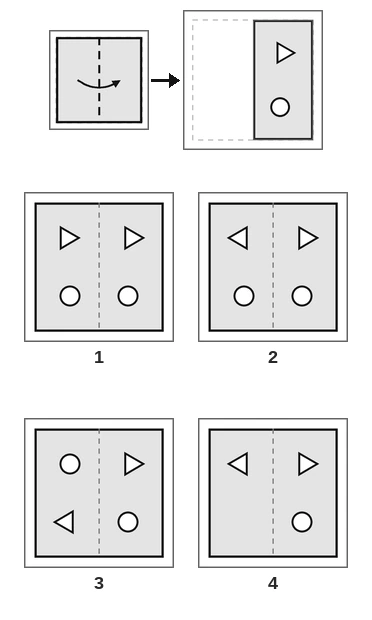
(a) Figure 1 (b) Figure 2 (c) Figure 3 (d) Figure 4
Answer. Only one fold here: the left half was laid over the right half. The right half never moved, and the paper was two layers thick when it was punched. Each punch went through both layers, so every hole gets a twin in the left half. To open the paper, flip the left half back across the upright crease. The circle near the bottom gets a twin at the same height on the left. The triangle near the top points right. Its twin sits at the same height on the left, and because it is mirrored, it points left. So the two triangles point away from the crease. Figure 2 shows exactly this. Figure 1 has both triangles pointing right, as if the twin was copied and not flipped. In Figure 3 the twins were turned round the centre instead of flipped, so on the left the circle and the triangle have swapped places. So the answer is (b) Figure 2.
Question 2
A square sheet of paper is folded along the dotted line as shown, and then holes are punched in it. How will the paper look when it is unfolded?
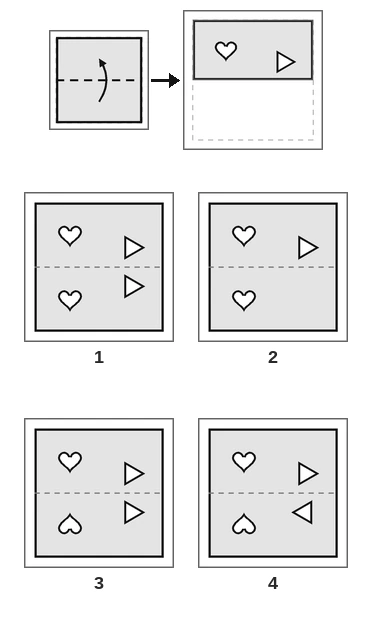
(a) Figure 1 (b) Figure 2 (c) Figure 3 (d) Figure 4
Answer. The bottom half was folded up over the top half, so the crease is the level middle line. Open it by flipping the bottom half down again. Every hole gets a twin straight below it, the same distance from the crease. Across a level crease, up and down swap, while left and right stay as they are. The heart near the top-left points down, so its twin near the bottom-left points up. The triangle points right, so its twin below it still points right. Figure 3 shows this. In Figure 1 the lower heart still points down, as if it were copied. Figure 4 turns the lower triangle to the left, which a level crease never does. So the answer is (c) Figure 3.
Opening the Folds, One at a Time
With two or three folds, don't try to open everything at once. Open the folds in reverse order: the last fold first, then the one before it, and so on. Each time you open a fold, do just one thing:
- Every hole you have so far gets a twin on the other side of that crease.
- The twin is the same distance from the crease, straight across it.
- The twin is a mirror image of the hole.
Then move on to the next crease with all the holes you now have.
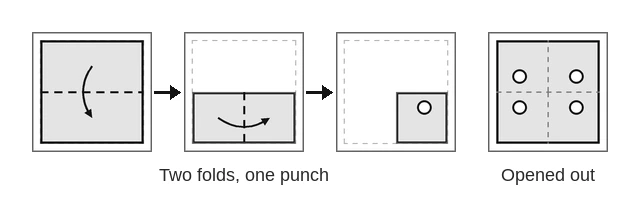
In the picture the top half came down first, then the left half went over to the right. The folded paper is the bottom-right quarter, four layers thick, and one circle was punched in it.
Open the last fold first. The left half flips back across the upright crease, so the circle gets a twin in the bottom-left quarter, at the same height and the same distance from the crease. Now open the first fold. The top half flips back up across the level crease, so both circles get twins straight above them. Four circles in all, one in each quarter, and each is the same distance from the two creases as the one you punched.
Watch the distances
A hole close to the crease has its twin close to the crease. A hole close to the edge has its twin close to the opposite edge. This is how you rule out options where a hole is in roughly the right quarter but at the wrong spot.
[SSC Tip] Say the folds back to yourself in reverse before you look at the options: "last fold upright, first fold level". Then open them in that order.
Solved Questions: Two Folds
Question 3
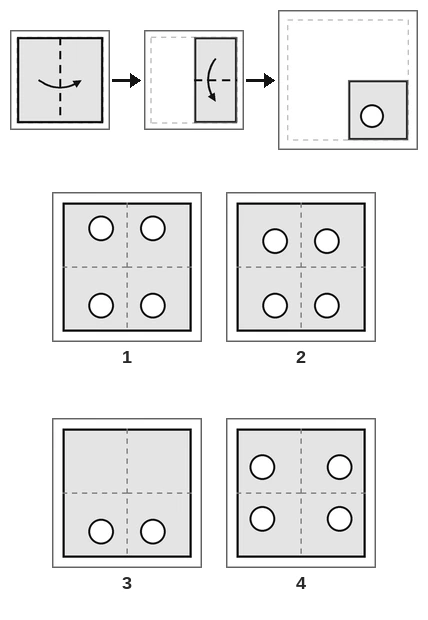
A square sheet of paper is folded along the dotted lines in the order shown, and then holes are punched in it as shown. How will the paper look when it is unfolded?
(a) Figure 1 (b) Figure 2 (c) Figure 3 (d) Figure 4
Answer. Two folds: first the left half over the right, then the top half down. The folded paper is the bottom-right quarter, four layers thick, so one punch gives four circles. Open the last fold first. The top half comes back up across the level crease, and the circle gets a twin straight above it. The circle was close to the bottom edge, so its twin is close to the top edge. Now open the first fold: the left half flips back across the upright crease, and both circles get twins on the left. That makes four circles, one in each quarter, each fairly close to the upright crease and to the top or bottom edge. Figure 1 has them. Figure 3 stops after opening one fold. In Figure 2 the top circles are too close to the middle, because they were slid up instead of flipped. Figure 4 puts the circles near the side edges. So the answer is (a) Figure 1.
Question 4
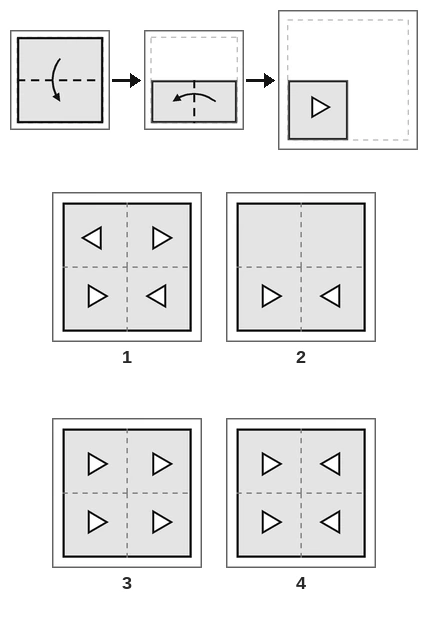
A paper is folded and cut as shown below. How will it appear when unfolded?
(a) Figure 1 (b) Figure 2 (c) Figure 3 (d) Figure 4
Answer. First the top half came down, then the right half was folded over to the left. The folded paper is the bottom-left quarter, four layers thick. Open the last fold first: the right half flips back across the upright crease. The triangle points right, so its twin in the bottom-right quarter points left. The two point towards each other. Now open the first fold: the top half flips up across the level crease. A level crease does not change left and right, so the top-left triangle still points right and the top-right one still points left. Figure 4 shows four triangles, the left ones pointing right and the right ones pointing left. In Figure 1 the top row has swapped directions, and Figure 2 shows only the bottom row, as if the paper was opened only once. So the answer is (d) Figure 4.
Question 5
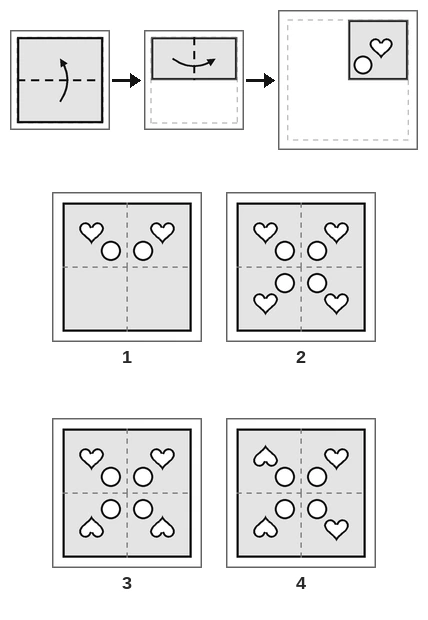
The figures show how a square sheet of paper is folded and where holes are punched in the folded paper. Select the figure that shows the paper when it is opened out.
(a) Figure 1 (b) Figure 2 (c) Figure 3 (d) Figure 4
Answer. The bottom half went up, then the left half went over to the right. The paper ends as the top-right quarter, four layers thick, with a heart near its outer corner and a circle near the centre. Each punch gives four holes, so expect four hearts and four circles. Open the last fold: across the upright crease, the heart gets a twin near the top-left corner. Left and right swap, but a heart pointing down still points down. The circle gets a twin near the centre on the left. Open the first fold: across the level crease, the two hearts get twins near the bottom corners, and these point up. The circles get twins just below the centre. Figure 3 matches: the hearts point down at the top and up at the bottom. Figure 2 has every heart pointing down, and Figure 4 flips the hearts across the upright crease instead of the level one. So the answer is (c) Figure 3.
Shapes That Point
A circle looks the same in a mirror, so for circles you only check places. Triangles and hearts point somewhere, and their twins are mirror images, so the direction can change. Which directions change depends on the crease.
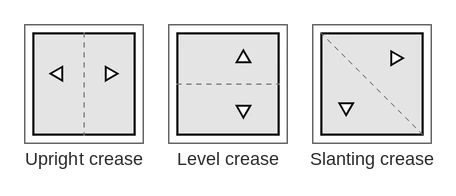
In the first picture a triangle pointing right was punched on the right of an upright crease. Its twin on the left points left. In the second, a triangle pointing up was punched above a level crease, and its twin below points down. The third has a slanting crease, and there the triangle pointing right has a twin pointing down.
The rule for each crease
| Crease | What swaps | What stays |
|---|---|---|
| upright | left and right | up and down |
| level | up and down | left and right |
| slanting, from top-left to bottom-right | right and down, left and up | nothing else |
| slanting, from bottom-left to top-right | right and up, left and down | nothing else |
So a triangle pointing right becomes pointing left across an upright crease, but stays pointing right across a level crease. A heart pointing down (the usual heart) stays pointing down across an upright crease and turns upside down across a level one.
A habit that saves marks
When you open a crease, ask about each twin: does it point along the crease or across it? A shape pointing across an upright crease (left or right) flips. A shape pointing along it (up or down) keeps its direction. The same works for a level crease.
A favourite wrong option has every hole in the right place but the shapes copied, all pointing the same way. Once you know which way each twin must point, it is easy to spot.
Solved Questions: Shapes That Point
Question 6
A square sheet of paper is folded along the dotted lines in the order shown, and then holes are punched in it as shown. How will the paper look when it is unfolded?
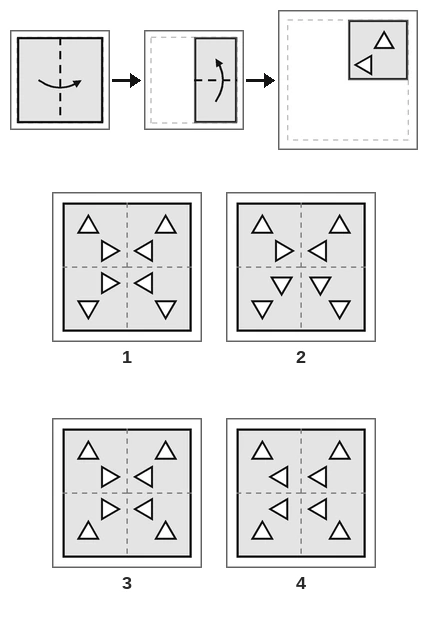
(a) Figure 1 (b) Figure 2 (c) Figure 3 (d) Figure 4
Answer. The left half went over to the right, then the bottom half came up. The folded paper is the top-right quarter, and it holds two triangles: one near the top corner pointing up, and one near the centre pointing left. Open the last fold first: the bottom half flips down across the level crease. Up turns into down, and left stays left. So in the bottom-right quarter the outer triangle points down and the inner one points left. Then open the first fold: the left half flips back across the upright crease. Now left turns into right, and up and down stay. On the left side the inner triangles point right, and the outer ones point up at the top and down at the bottom. Figure 1 shows all eight. Figure 3 keeps every outer triangle pointing up, and Figure 4 has all the inner ones pointing left. So the answer is (a) Figure 1.
Question 7
A paper is folded and cut as shown below. How will it appear when unfolded?
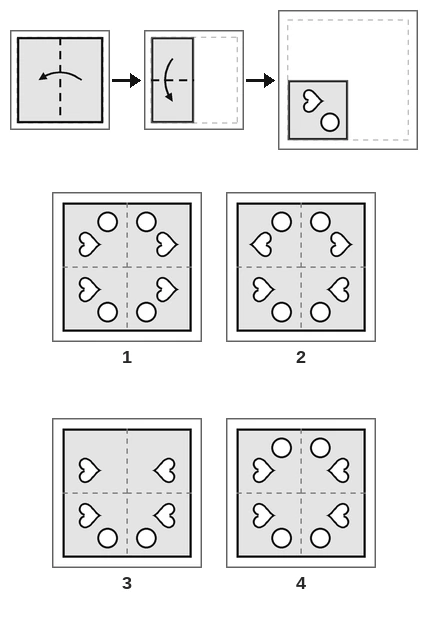
(a) Figure 1 (b) Figure 2 (c) Figure 3 (d) Figure 4
Answer. The right half was folded over to the left, then the top half came down. The paper is now the bottom-left quarter. It has a heart pointing right, near the left edge, and a circle near the bottom edge. Open the last fold: the top half goes back up across the level crease. The heart gets a twin above it in the top-left quarter, and the twin still points right, because a level crease only swaps up and down. The circle gets a twin near the top edge. Open the first fold: the right half flips back across the upright crease. Every heart gets a twin on the right that points left, and every circle gets a twin on the right. Figure 4 has four hearts, all pointing towards the upright crease, and four circles near the top and bottom edges. In Figure 2 the top hearts point the wrong way, and Figure 3 has lost the two circles at the top. So the answer is (d) Figure 4.
Question 8
The figures show how a square sheet of paper is folded and where holes are punched in the folded paper. Select the figure that shows the paper when it is opened out.
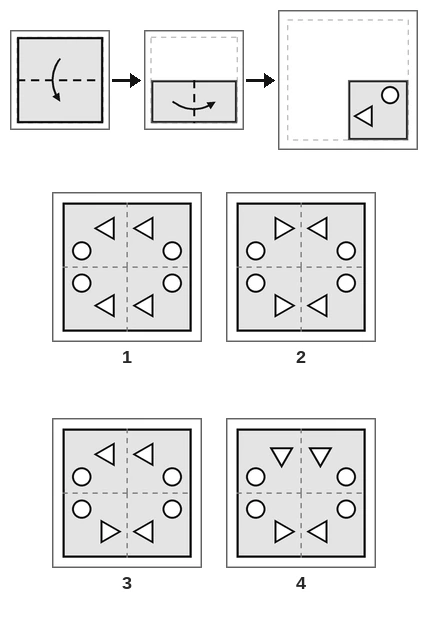
(a) Figure 1 (b) Figure 2 (c) Figure 3 (d) Figure 4
Answer. Top half down, then left half over to the right: the folded paper is the bottom-right quarter, four layers thick. Two holes were punched, so the opened sheet must have eight holes, and all four answer figures do. So the check comes down to directions. The triangle points left, towards the upright crease. Open the left half back: its twin on the left is mirrored and points right, again towards the crease. Open the top half: the twins above keep their left and right directions. So all four triangles point at the upright crease. Figure 2 shows this. In Figure 3 the triangle in the top-left quarter points left, and in Figure 4 the top two point down. So the answer is (b) Figure 2.
Diagonal Folds
A fold along a diagonal of the square turns it into a triangle. A second fold along the other diagonal gives a smaller triangle, a quarter of the sheet. Sometimes the sheet is first folded into a quarter on the middle lines, and then that small square is folded along its own diagonal. That crease is part of a diagonal of the whole sheet.
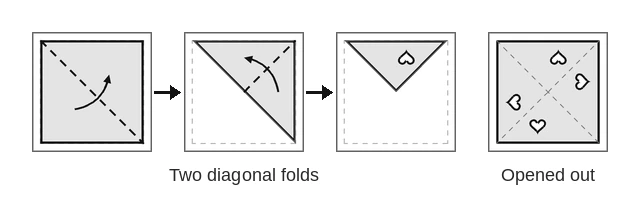
In the picture the bottom-left half was folded over along the diagonal from the top-left corner, then the bottom-right part went over along the other diagonal. The paper is a quarter-triangle, four layers thick, and one heart pointing up was punched near the top edge. Opened out there are four hearts, one near each side, each pointing out at its side.
Finding a twin across a slanting crease
Imagine walking from the hole straight to the crease, at right angles to it, and then the same distance past it. That is where the twin goes. A hole near the top edge lands near the left edge or the right edge, depending on which diagonal it is.
Directions across a slanting crease
| Crease | right becomes | up becomes |
|---|---|---|
| from top-left to bottom-right | down | left |
| from bottom-left to top-right | up | right |
The opened sheet of a diagonal question has its creases drawn as dashed lines, often cutting the sheet into eight slices. Each hole sits in one slice, and its twin is in the slice next to it across a dashed line. Use the slices to check places quickly.
Solved Questions: Diagonal Folds
Question 9
A square sheet of paper is folded along the dotted line as shown, and then holes are punched in it. How will the paper look when it is unfolded?
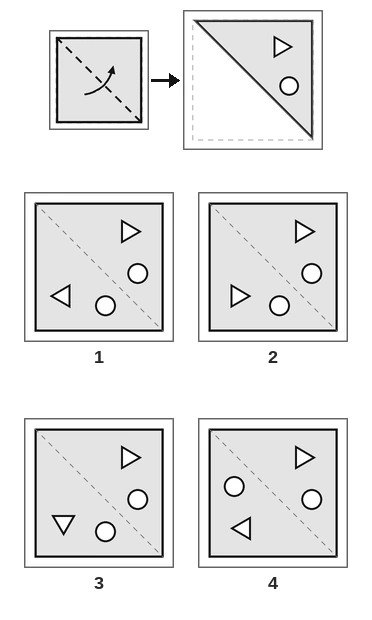
(a) Figure 1 (b) Figure 2 (c) Figure 3 (d) Figure 4
Answer. The fold line is the diagonal from the top-left corner to the bottom-right corner. The bottom-left half was laid over the top-right half, so each hole gets one twin in the bottom-left half. To find a twin, imagine walking from the hole straight to the crease, at right angles to it, and the same distance past it. The triangle near the top edge lands near the left edge. The circle near the right edge, just below the middle, lands near the bottom edge, just right of the middle. Directions change the same way: across this crease, right turns into down. So the twin triangle points down. Figure 3 has a triangle pointing down in the bottom-left part. Figure 2 keeps it pointing right, and Figure 1 turns it to the left, as an upright crease would. So the answer is (c) Figure 3.
Question 10
A square sheet of paper is folded along the dotted lines in the order shown, and then holes are punched in it as shown. How will the paper look when it is unfolded?
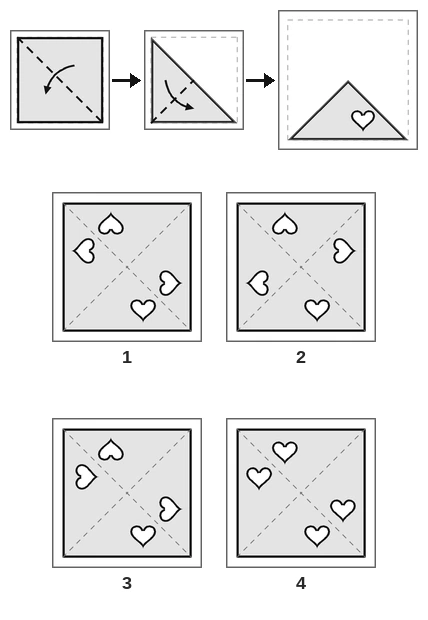
(a) Figure 1 (b) Figure 2 (c) Figure 3 (d) Figure 4
Answer. First the top-right half went over along one diagonal, then the top-left side went over along the other. The paper is now the bottom quarter-triangle, four layers thick, so the single heart becomes four hearts. Open the last fold: its crease runs from the bottom-left corner to the top-right corner. Across it, down turns into left, so the heart near the bottom edge gets a twin near the left edge pointing left. Then open the first fold, the diagonal from the top-left corner to the bottom-right corner. Across it, down turns into right and left turns into up. So there is a heart near the right edge pointing right, and one near the top edge pointing up. Each heart points out at the side it is near. Look at the positions too: the bottom heart is a little right of the middle, the right one a little below the middle, the top one a little left of the middle and the left one a little above it. Figure 1 matches. Figure 2 is the trap. Its hearts point the same ways, but the right one sits above the middle and the left one below it, as if the heart had been turned round the centre instead of mirrored. So the answer is (a) Figure 1.
Question 11
The figures show how a square sheet of paper is folded and where holes are punched in the folded paper. Select the figure that shows the paper when it is opened out.
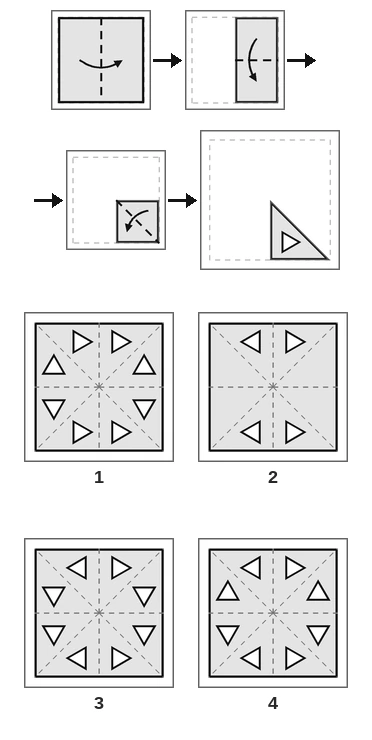
(a) Figure 1 (b) Figure 2 (c) Figure 3 (d) Figure 4
Answer. Three folds: left over right, top down, and then the top-right half of that small square over along its diagonal. That leaves eight layers, so one punch makes eight triangles. Open the last fold first. Its crease is part of the diagonal from the top-left corner to the bottom-right corner, and across it right turns into down. So the triangle near the bottom edge, pointing right, gets a twin near the right edge pointing down. Next open the level crease: these two get twins in the top-right quarter. The one near the top edge still points right, and the one near the right edge now points up. Last, open the upright crease: everything gets a mirrored twin on the left, so right turns into left, and up and down stay. Figure 4 shows all eight. Figure 2 has only four, because the diagonal fold was never opened. In Figure 1 the triangles near the top and bottom on the left still point right. Time check: with three folds, open them one at a time and it still fits in 30–45 seconds. So the answer is (d) Figure 4.
A Narrow Strip Folded In
Not every fold is on a middle line. Sometimes only a narrow strip along one edge, a quarter of the width, is folded in. Then the paper is doubled only where the strip lies, and single everywhere else.
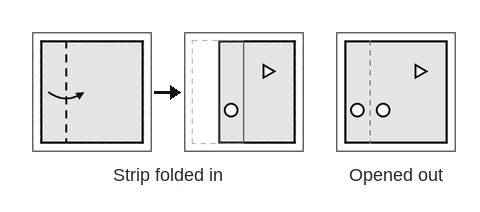
In the picture a strip on the left was folded in. A circle was punched where the strip lies, through two layers, and a triangle was punched in the single part. Opened out, the circle has a twin, mirrored across the strip's crease, and the triangle stays alone.
Two things to watch
- The crease is a quarter of the way in from the edge, not on the middle line. Twins are mirrored across that crease, so a hole near it has its twin near it too.
- Holes outside the strip do not get twins from the strip. Count the layers under each hole separately.
When a strip is folded and then the paper is folded in half as well, the part under the strip is four layers thick and the rest is two. Work out the layers for each hole before you count.
Solved Questions: Strips
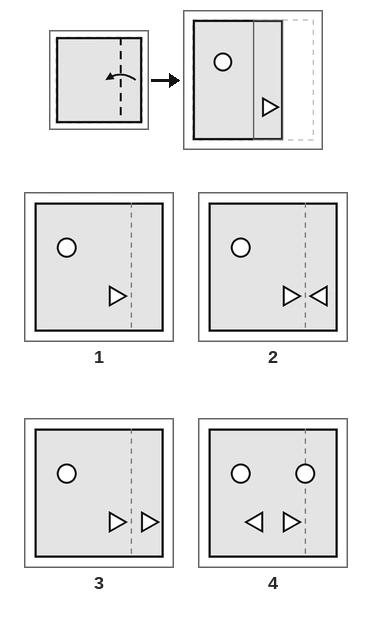
Question 12
A square sheet of paper is folded along the dotted line as shown, and then holes are punched in it. How will the paper look when it is unfolded?
(a) Figure 1 (b) Figure 2 (c) Figure 3 (d) Figure 4
Answer. This fold is not on the middle line. Only a narrow strip on the right, a quarter of the width, was folded in, so only the part under the strip had two layers. The circle on the left was punched through one layer, so it stays a single circle. The triangle was punched inside the strip, through two layers, so it gets one twin. The crease is the line a quarter of the way in from the right edge, and the twin is mirrored across it, not across the middle. The triangle points right, towards the crease, so its twin on the other side points left, back towards the crease. Figure 2 shows one circle and two triangles pointing at each other across the crease. Figure 4 mirrors the holes across the middle line instead, and Figure 3 copies the triangle without flipping it. So the answer is (b) Figure 2.
Question 13
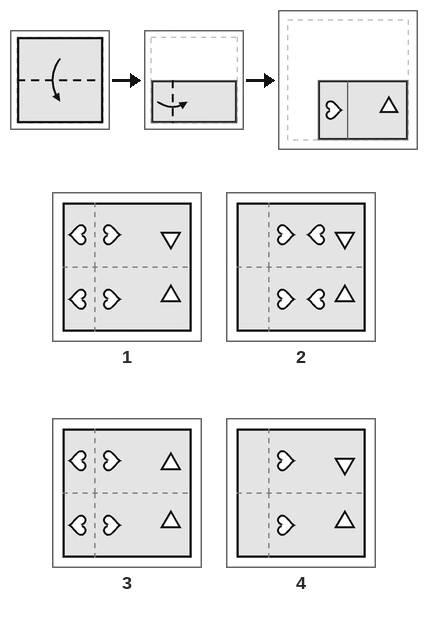
A square sheet of paper is folded along the dotted lines in the order shown, and then holes are punched in it as shown. How will the paper look when it is unfolded?
(a) Figure 1 (b) Figure 2 (c) Figure 3 (d) Figure 4
Answer. First the top half came down, so everything is two layers. Then a narrow strip on the left, a quarter of the width, was folded in. Where the strip lies the paper is four layers, and elsewhere it is two. The heart was punched under the strip, so it makes four hearts. The triangle was punched outside it, so it makes only two. Open the strip first: the heart gets a twin mirrored across the crease a quarter of the way in from the left edge. The heart points right, so the twin points left, and the two hearts sit back to back. Then open the level crease: the hearts and the triangle get twins in the top half. The triangle pointed up, so its twin points down. Figure 1 has four hearts and two triangles like this. Figure 2 puts the hearts’ twins across the middle line, and Figure 4 forgets the strip, so it has only two hearts. So the answer is (a) Figure 1.
Count First, Then Check Directions
Here is a quick order of work that catches almost every wrong option.
Step 1: count
Work out the layers under each punched hole and add them up. One fold gives two layers, two folds four and three folds eight, as long as each fold covers the whole paper. A strip, or a fold that lays only part of the paper over, makes some places thicker than others, so count place by place. Any option with the wrong number of holes is out.
Step 2: places
Open the folds in reverse, one crease at a time, and check where the twins go. Each twin is the same distance from its crease as the hole it came from.
Step 3: directions
Only now look at triangles and hearts. Across each crease, decide which directions swap.
The usual wrong options
- One layer's holes are missing, as if one fold was never opened.
- A shape is copied or slid across instead of mirrored, so it points the wrong way.
- The holes are mirrored across the wrong crease.
- An extra hole appears where none was punched.
- All holes are in the right places but one of them points the wrong way.
Time check: a paper folding question should take 30–45 seconds. With three folds, the counting step alone often leaves only one or two options.
[SSC Tip] When all four options have the same number of holes, the question is testing directions. Go straight to the shapes that point.
Solved Questions: Three Folds
Question 14
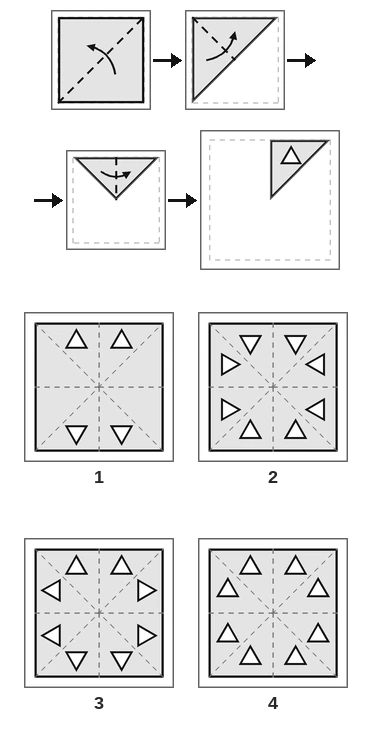
A paper is folded and cut as shown below. How will it appear when unfolded?
(a) Figure 1 (b) Figure 2 (c) Figure 3 (d) Figure 4
Answer. Here both diagonals are folded first, then the upright line. Three folds, each halving the paper, make eight layers and eight triangles. The last fold was the upright line, so open it first: the triangle near the top edge, pointing up, gets a twin at the same height on the left, still pointing up. Next open the second fold, the diagonal from the top-left corner to the bottom-right corner. Across it, up turns into left, so the two triangles near the top edge get twins near the left edge pointing left. Last, open the first fold, the other diagonal. Across it, up turns into right and left turns into down. So two more triangles appear near the right edge pointing right, and two near the bottom edge pointing down. Every triangle ends up pointing out at the edge it is near. Figure 3 shows this. Figure 2 has them all pointing in, and Figure 1 has only four. So the answer is (c) Figure 3.
Question 15
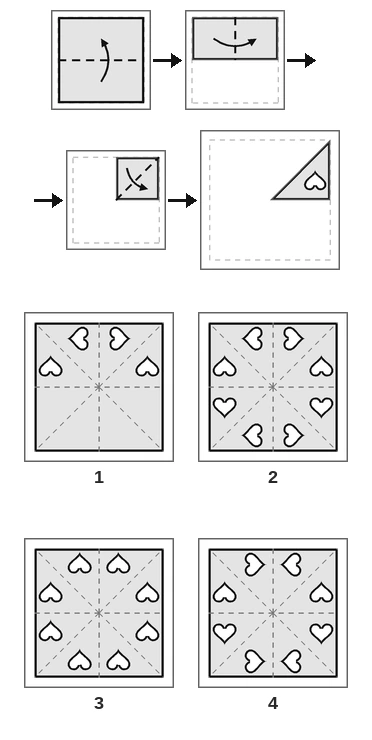
The figures show how a square sheet of paper is folded and where holes are punched in the folded paper. Select the figure that shows the paper when it is opened out.
(a) Figure 1 (b) Figure 2 (c) Figure 3 (d) Figure 4
Answer. Bottom half up, left half over, then the top-left half of the small square over along its diagonal. The heart sits near the right edge, just above the middle, pointing up. Open the last fold first. Its crease is part of the diagonal from the bottom-left corner to the top-right corner, and across it up turns into right. So the twin sits near the top edge, just right of the middle, pointing right. Open the upright crease: both hearts get twins on the left, with right turning into left. Open the level crease: all four get twins in the bottom half, with up turning into down. So the hearts near the side edges point up in the top half and down in the bottom half, and the hearts near the top and bottom edges point away from the upright crease. Figure 2 shows that. In Figure 4 the hearts near the top and bottom edges point towards the middle, and Figure 1 never opens the level crease. So the answer is (b) Figure 2.
Transparent Sheets Folded at a Middle Line
A transparent sheet is see-through, like a plastic sheet with marks drawn on it. It is folded along a middle line (upright, level or along a diagonal), and an arrow shows which half moves. You pick the figure that shows what you see after the fold. The question reads: "A transparent sheet with a pattern is given below. Select the option that depicts the pattern that would appear when the given transparent sheet is folded at the dotted line as shown."
What you see after the fold
- The marks on the half that stays do not move at all.
- The marks on the half that moves come over and lie on top. Because the sheet is see-through, they still show, but they are mirrored across the fold line.
So the answer always has every mark of the sheet in it: the staying marks as they were, and the moving marks mirrored.
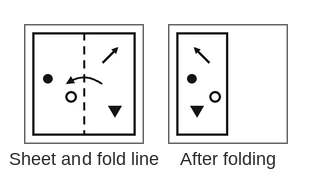
In the picture the right half folds over onto the left half. The dot and the circle stay. The arrow pointing up and to the right comes across and now points up and to the left. The black triangle pointing down still points down, because an upright fold swaps only left and right.
The usual wrong options
- The moving marks are slid across without being mirrored.
- Every mark is flipped, as if the other half had stayed.
- One mark is missing.
The mirror rules are the same as for punched holes: an upright line swaps left and right, a level line swaps up and down, and a diagonal line swaps right with down or right with up.
Time check: a transparent sheet question should take 25–35 seconds.
Solved Questions: Transparent Sheets
Question 16
A transparent sheet with a pattern is given below. Select the option that depicts the pattern that would appear when the given transparent sheet is folded at the dotted line as shown.
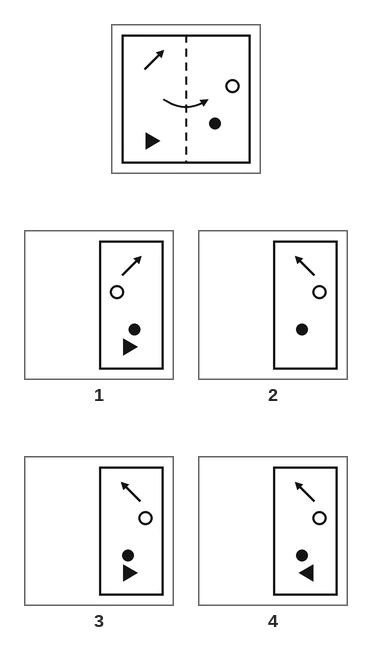
(a) Figure 1 (b) Figure 2 (c) Figure 3 (d) Figure 4
Answer. The sheet is folded along the upright middle line, and the arrow shows the left half going over onto the right half. The right half stays as it is, so the circle and the dot do not move. The sheet is see-through, so the marks of the left half still show after the fold, but they are mirrored across the line. The arrow pointed up and to the right, so now it points up and to the left, near the top. The black triangle pointed right, so now it points left, near the bottom. Figure 4 shows all four marks this way. Figure 3 has the triangle still pointing right, and in Figure 1 every mark is flipped, even the circle and the dot that never moved. So the answer is (d) Figure 4.
Question 17
Select the figure that shows how the given transparent sheet will look when it is folded along the dotted line in the direction of the arrow.
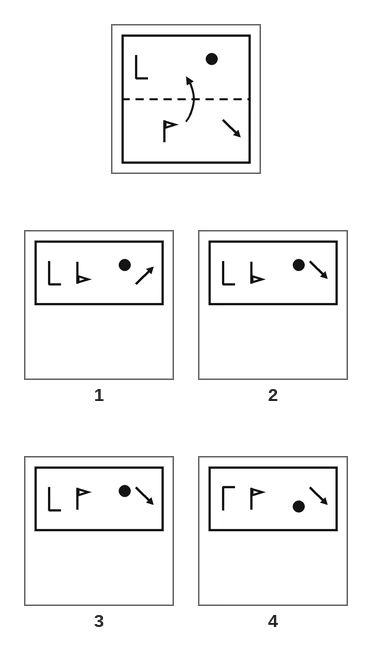
(a) Figure 1 (b) Figure 2 (c) Figure 3 (d) Figure 4
Answer. The bottom half folds up along the level middle line onto the top half. The L and the dot are on the top half, so they stay just as they are. The flag and the arrow come up and are seen mirrored, with top and bottom swapped. The flag had its cloth at the top of its pole, pointing right. After the fold the cloth is at the bottom of the pole, still pointing right. The arrow pointed down and to the right, so it now points up and to the right. Figure 1 shows this. Figure 3 moves the flag and the arrow up without flipping them, and Figure 2 flips the flag but not the arrow. So the answer is (a) Figure 1.
Question 18
A transparent sheet with a pattern is given below. Select the option that depicts the pattern that would appear when the given transparent sheet is folded at the dotted line as shown.
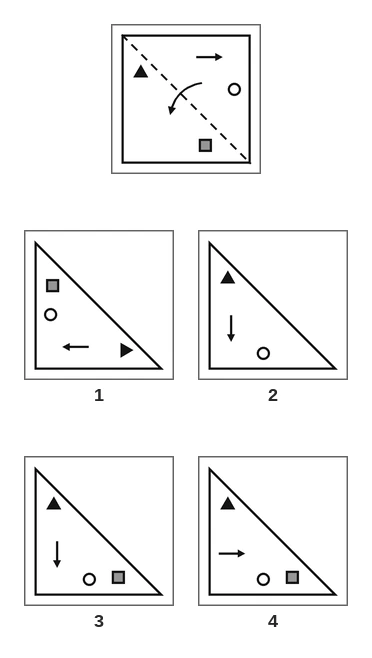
(a) Figure 1 (b) Figure 2 (c) Figure 3 (d) Figure 4
Answer. The fold line is the diagonal from the top-left corner to the bottom-right corner, and the top-right half folds over onto the bottom-left half. The black triangle and the grey square are already on the bottom-left half, so they stay put. The arrow and the circle come over, mirrored across the slanting line. Walk from a mark straight to the line and the same distance past it: the arrow near the top edge lands near the left edge, and the circle near the right edge lands near the bottom edge. Directions swap too: right becomes down, so the arrow now points down. Figure 3 shows this. In Figure 4 the arrow still points right, as if it had slid across without flipping, and Figure 2 has lost the grey square. So the answer is (c) Figure 3.